Integration of Bitrix with Bitrix24
1C-Bitrix 🧡 Bitrix24
If you have a website on 1C-Bitrix: Site Management and you plan to set up a full integration with CRM Bitrix24, it may seem like a simple task that doesn't require much effort, especially since there is already built-in integration. In reality, there are many unanswered questions. Based on the experience of solutions that allow for a full integration of Bitrix24 and 1C-Bitrix, there are not so many.
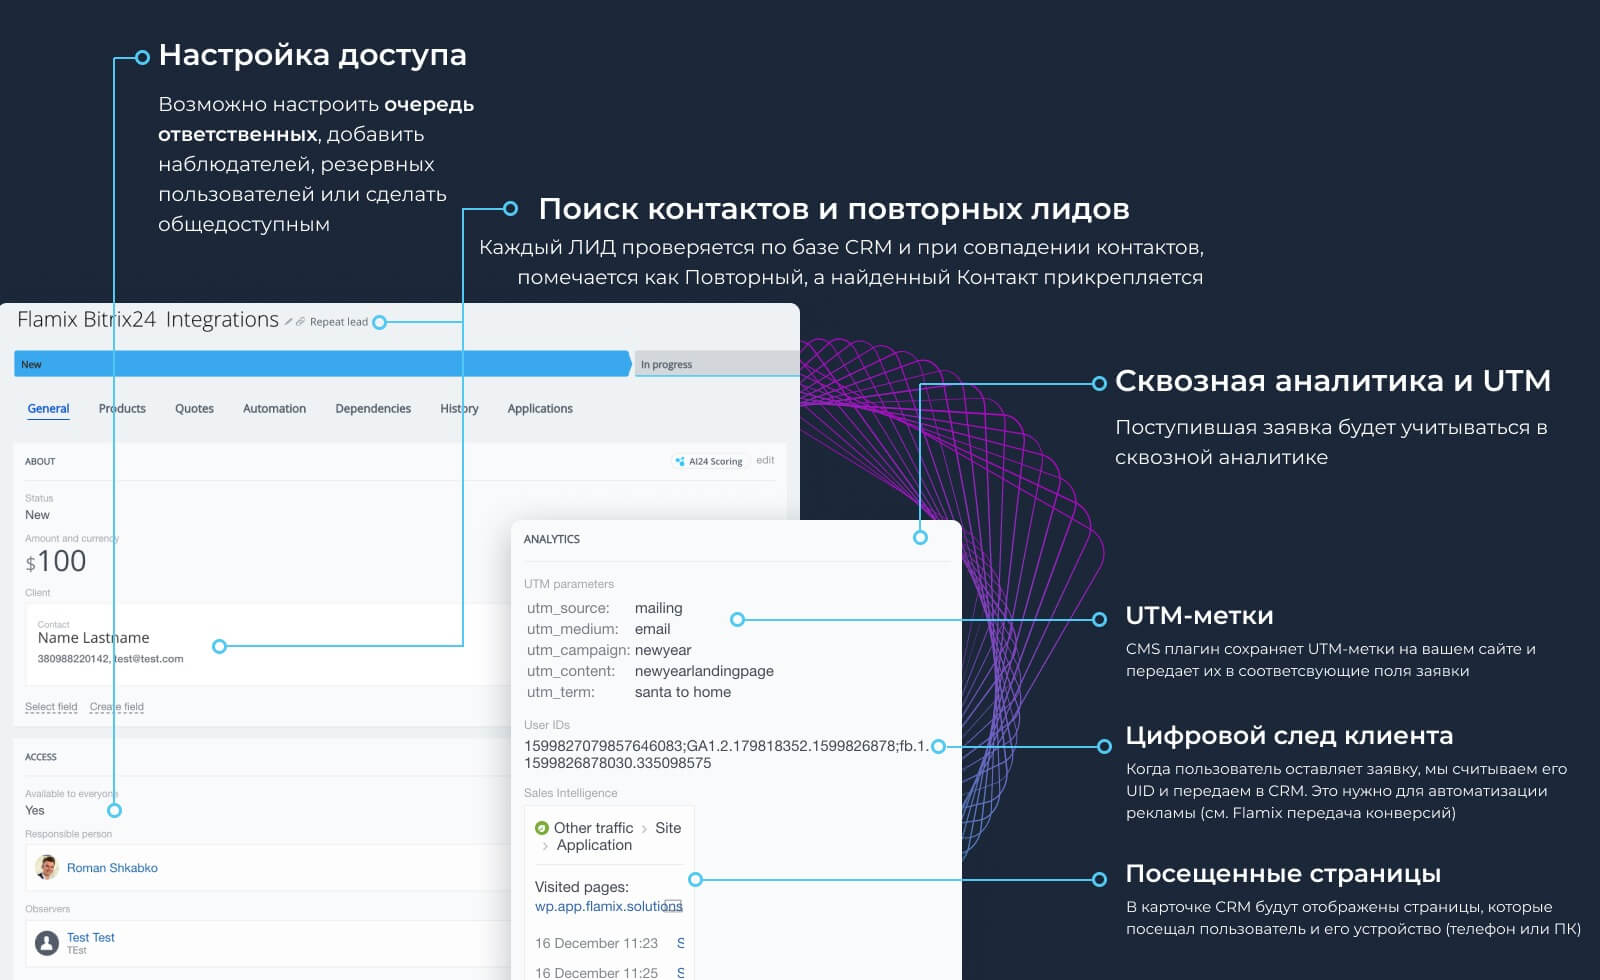
For example, standard integration does not pass UTM tags or synchronize orders. It's difficult even for an experienced programmer to enhance the functionality of the standard integration. Our plugin for full integration of Bitrix24 with Bitrix addresses this issue. We have taken into account all the details: UTM tags, product search, phone number formatting, reverse synchronization of order statuses, visited pages, and more.
Fields integration
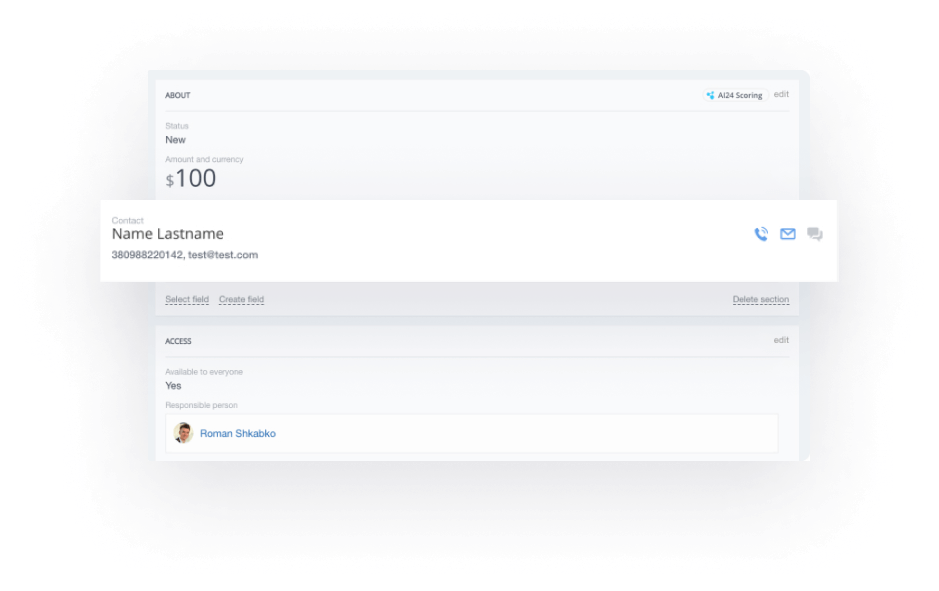
Integration creates a Lead or Deal. The module configures the correspondence of fields on the Site and CRM. There is no limit on the number of leads and fields!
UTM tags and analytics
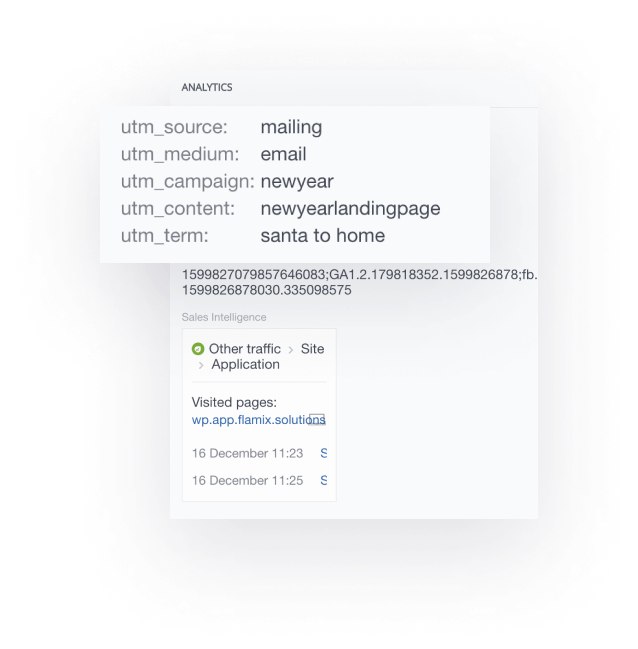
The module on the site remembers and transmits detailed user analytics: UTM tags, visited pages, client identifiers (Google, Facebook, Yandex), referral domain, client IP address. The plugin fully works with end-to-end analytics!
Order with product
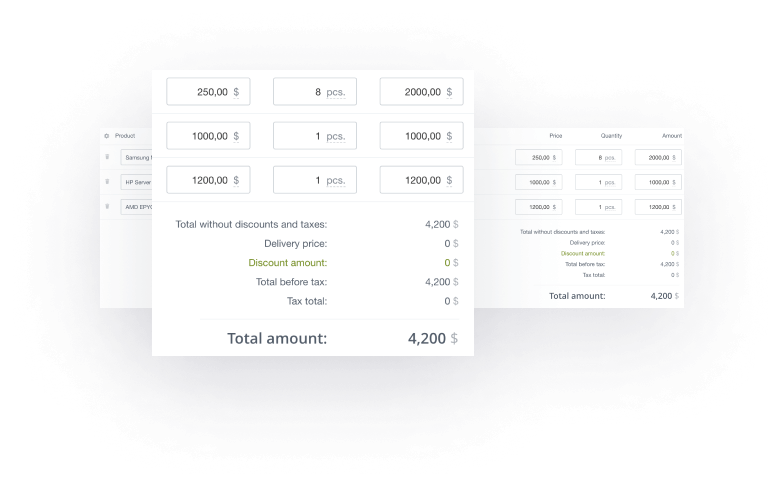
You can transfer goods to a Deal or LEAD. There is a product search option to link the product on the Site and in CRM (required for inventory control).
Queue of responsible
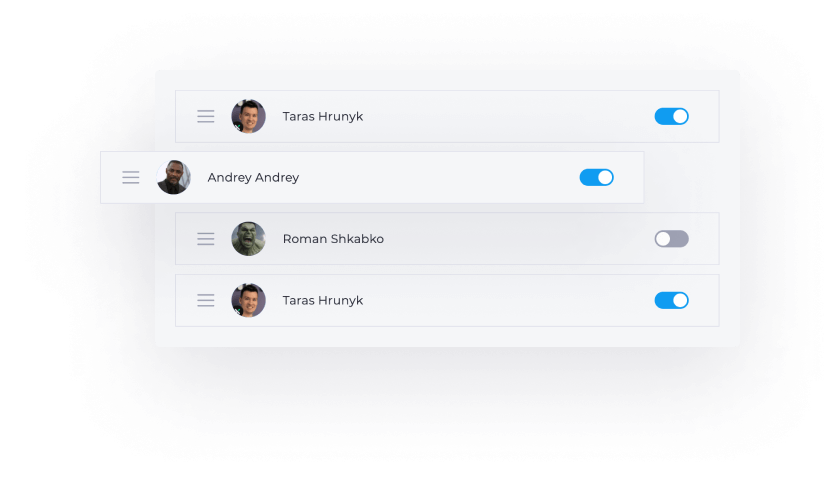
Configure who will receive applications and in what order. A new appeal from a familiar client will go to the manager who previously worked with the client (optional, if the manager is not fired).
Phone auto-formatting
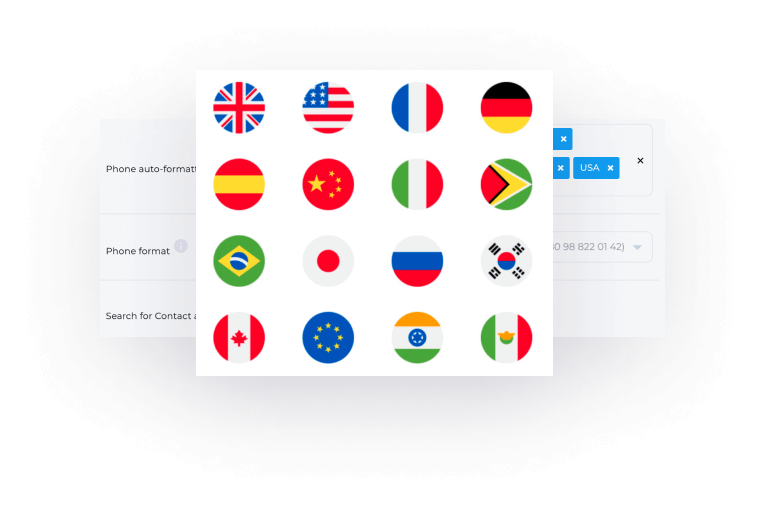
For accurate customer identification, phones must be stored in a single format. Select one or several countries and in what format the number should be given. The module supports ALL countries. Each phone number is cleared of letters and special characters.
And much more…
Search for Contacts and Companies, control of repeated leads, notifications to the responsible, replacement of the price and name of goods from the Bitrix24 catalog, installation, consultations and support.
It is possible to customize the plugin for client requests.
Test first, then buy. Each of our modules has a free trial period of 30 days. During testing, you will receive full technical support.
Install
The module is available as part of the subscription Flamix.Bundle.
🔥 Maximize your business efficiency and convenience with a subscription to all Bitrix24 apps, reducing costs by up to 80% while gaining access to a comprehensive suite of business tools.
Instructions for installing and activating a trial.
Payment Methods

Details about payment methods. Have questions - contact us.
- Private cloud or on-Premise
- Custom Development
- Premium Support
- No limits
- Product Training
- Maximum performance
API and SDK
Thanks to a single open API, the programmer can customize the integration for any task. SDK (feature set) speeds up your work several times!
<?php
// Put this on every page, if need catch UTM
\Flamix\Bitrix24\Trace::init('Your page title');

//When sent form
try {
    \Flamix\Bitrix24\Lead::getInstance()
    ->changeSubDomain('leadframework')
    ->setDomain('YOUR.BITRIX24.COM')
    ->setToken('YOUR.API.KEY')
    ->send(['name'=>'Roma','phone'=>'+3809811']);
} catch (\Exception $e) {
    $e->getMessage();
}
?>
Ready modules for CMS
For popular CMS, we have developed modules that can be installed in a few clicks and placed in the official marketplaces.
Enter the data in the fields and the integration will work!
Version history
Current stable version — master, 08.12.2025
The app works in the cloud and updates automatically.
- Update Banned Portal
- Increase queue to lead
- Delete old last value methods
- Now new value will be store in cache
- Status: add portal_id to setting
- Unban
- Banned server
- Banned
- Queue to 10
- Update translate
- CDN domain update
- Banned
- Decrise queue count
- DOCS: Fix product typo
- Shopify - Add notes
- Testing
- Banned some portal
- New banned
- Camel to Snake fix
- Fix Product Finder
- Update UI
- Status request fix error
- Robots disalow
- Improve Duplicate controller
- Order in payment can be a string
- Hot fix
- Refactoring
- Test New Product Finder
- Improve Payment In Order
- New Banned
- Product: Improve verify
- Lead Product: Cache Product iBlock && Improve Offers Search && Verify Product
- New banned
- Add products fields
- UI reviews fix
- Fix docs redarect
- Update UI
- Upgrade npm
- Update core and add review
- Payment added on queue with solid delay
- Remove scoupe
- Add in lead video
- Framowork video
- Magento video
- Add video example to general
- Add vedio example
- New banned
- Lang fix
- Hot fix
- Show field count warning
- Epic now use token
- Fix addlead bill id
- Fix DOCs Error
- Update UI
- Remove JS larabug
- Add more queue to lead and fix status queue
- Horoshop: Add Warehouse ID
- Status block 600 -> 3000
- Update Logs UI
- Remove params from phone number
- Logging 4 days
- Now 5 lead queue
- Show error when import test order or parce
- Second city
- Error page
- Fix empty file
- Fix error when proxy parce
- Improve queue interval
- New status block mechanism
- Small refactoring
- Tilda: Add payment instructions
- Fix CRM Status and Payment request
- Banned new CRM
- Modify status controller
- Remove CACHE_PREFIX from env
- Fix cache prefix
- Add Tilda Payment hook
- Fix many responsibel in translation
- Magento video
- UF_CRM_FX_CONVERSION can be empty
- Add 4 dedic worker to phone
- Add link to payment video
- Magento free env
- Check host when pay
- Fix payment ID
- Disable payment
- Fix translate error
- Increase Phone queue to 4
- Increase Phone queue to 4
- Magento env
- Change docs auth img
- New general docs
- Delete old public docs
- Fix docs redirect
- Comments to queue
- Tries in Queue
- Repeat Lead option in setting
- Payment setting
- Add navbar
- Fix payment
- Docs to public
- NEW! Doc finish (only video left)
- Payment return ok -> success
- New Docs MVP
- Status translate
- API route refactoring
- Add Deal Payment API
- Job timeout 120
- Show last field value in example
- Improve field value example queue save
- Deap Add Lead refactoring && Change logic
- AddLead: Refactoring and increase timeout to 60
- Lead to Deal Conversion Time
- Fix style in seconds
- IM: Mark connector created when its added succesfully
- Now API Proxy can change URL. Add Prom URLs.
- Add ORDER_NUMBER
- ShopExpress: Enable status
- Shop-express (dev)
- Small refactoring
- Status: Logging input request change
- Store setting in cache by 1 hour
- Enable setting cache
- Optimize
- Small refactoring
- Fix bug with tilda SKU
- Optimize status check
- Horoshop payment and free accrss
- Small fix
- Fix status delite
- Horoshop status translate
- Fix error, when status not exist end disabled in settings to exchange
- Horoshop PRO: price
- Add horoshop PRO
- Market: Now can add independet settings
- Horoshop
- Marketplace - New fields validations
- Fix en translate
- Fix field deliting
- PhoneNumber - Fix 5.2.0 version, because in next do not used locale
- Safary compability
- Update UI && route rafactoring
- Increase timeout
- Fix status problem
- UI update
- Status small refactoring
- Delete old Middelware by UA blocked portal
- API limit request by DOMAIN and IP
- Hot fix
- Fix empty field
- Set FieldsValueExample
- Hot fix
- Placemant
- Disable/enable status sync
- Fix translate
- Fields Helper and Source ID Select in settings
- Loading - Add popup with required actions
- Deal Direction
- Order ID in fields
- Status loop protections
- SOURCE_ID: WEB by default
- WP: separate instructions
- Product Price - Extra float controll
- Fix price
- Hot fix
- Proxy now show status error
- Fix status sync error
- Fix User Error
- Core 2
- Routing
- Update ENV and App24 Core
- Fix old file upload
- Change status when add lead or deal. Status have 2 10 seconds delay
- Small status refactoring
- Status now have separate queue
- Reduce queue number
- Improve queue monitor to 600
- Update UI
- Update packages
- Test queue monitor
- Small phone fix
- Small fix
- PhoneFirmat now uniq to 30 seconds
- Horoshop: Percente discount
- Horoshop: Discount to product
- Shop Express config
- Small refactoring
- Horoshop: Add delivery_city_stable
- ProxyParcer fix
- Hide instructions
- Shopify: Add SKU to product
- Shopify: Fix EN translate
- Phone: Improve setting UI
- Phone: Company finish translate
- Phone: Company on batch
- Phone: Division by zero fix!
- Phone: Company when update or add
- Fix status small bug
- App24 - 1.0
- Add Payment WWW integration
- Clear some env
- Translate statuses and clear some env
- Add video
- Horoshop: Fix UTM
- Fix convert setting error
- Fix setting converter when not array
- Fix convert cmd
- Hot fix
- Uniq Lead Key
- Status refactoring
- Add instruction
- Horoshop site page
- Horoshop config fix
- Horoshop MVP
- UI update
- Prom, Satu and Deal
- Marketplace: API changed
- Kasta payment ID
- Menu: Marketplace dynamicly added
- Add auth token to marketplace
- Marketplace: refactoring, add token auth
- Kasta: Add UI
- Delete calendar
- Remove calendar from CSS
- Check browser update
- Hot fix status
- Fix error with getOrderIDCRMPlace in Status
- Fix error when add image
- getOrderIDCRMPlace now return false if empty
- PhoneNumber: Hot fix bug whit new Laravel pakages
- Hot fix
- Show XML_ID changer
- Fix bug with getOrderIDCRMPlace
- Enable product in Shopify
- Tilda Find BY text changed
- Shopify SKU
- WIX fix
- Fix bug when ORDER_FIELDS is empty
- Fix error when its not URL
- Laravel 10 update
- Add same CACHE_PREFIX to fix bug with cache
- File uploaded by URLs
- Now file accepted by URL
- Small refactoring
- Change back to listen
- Remove separated queue cmd
- queue: listen to work
- Small typo fix
- Small fix
- Small fix
- New app24 sdk
- Fix bug when status from one site delete from other
- Update readme
- Change App24 to github
- Change BitBucket to Github
- Integrations Setting small refactoring
- Integrations refactory
- Phone: improve queue
- Status Code Refactoring
- Fix bug when select field was deleted
- Multi fields fix
- Ignore menu in workua and robota.ua
- Work and Robota env
- Started Work.ua and Robota.ua
- Allo
- Add video instructions to CMS
- Add video to existing CMS
- Separated qeueu to phone formating
- Phone error catch
- New deploy
- Memcached
- Supervisor
- Redis + Add video to WIX and Shopify
- Add adress to shopify
- GForm: Refactoring
- Small refactoring
- Fix multiple bug
- Delete comment
- Small country fix
- Deleting country && Refactoring
- ProductFields fix bug in UI
- Zero downtime
- Storage now general to all
- Marketplace: Delete proxy
- Events refactoring
- Support multistatus
- Remove INTEGRATIONS_SETTINGS_PRODUCT_SEARCH_XML_ID dubl 0
- Add packege count UI info
- Phone: Add PHONE_FORMAT_ENABLE_NOTIFY to UI
- Phone: separated queue
- Phone: Moved to JOB
- Phone: Setting for notifications in controller
- Phone: Batch refactoring && small improvement
- Epicenter: Translate status
- Add proxy
- Shopify and WIX to Market
- Disable Status in meny to WIX && Shopify
- WIX && Shopify config
- Epicenter && Rozetka - Fix price
- Update Epicenter env
- Epicenter env
- Marketplace dinamyc type
- WIX & Shopify start congig
- Match URL: WIX && Shopify
- Shopify config
- WIX instructions
- Small fix
- Small refactoring
- Small GForm refactoring
- GForms separate logging
- Shopify && WIX
- WIX - Prepared
- Tilda Simply refactoring
- Add HOSTNAME to tilda by default
- Update apps name translate
- Migrate marketplace route to separated route
- Update UI
- Remove CRM/Core
- Small typo
- Change settings to new controller
- Change phone display
- Tilda add 10 seconds tilda status pause
- Bind setting change
- Status translate
- Fix error in UA lang
- Fix eeror with app name when add to Contact-center
- Rozetka video
- CS-Cart video
- Rozetka: Fix error when try to save empty connection
- Update UI && Market connector check
- Increase Messages limit
- Fix tilda XML_ID
- Gitignore
- Gitignore
- Add rozetka logo
- Marketplace: fix many small errors
- Marketplace: translate, improve UI and refactoring
- Update UI
- Fix Rozetka Controller
- Tilda Status Fix bugs
- Add tilda docs
- Add Docs
- Tilda status functional
- product Compability
- Tilda: Support dinamic discount
- Add documentation
- Messager finish
- Add Marketplace P2 (Prototipe)
- Improve DuplicateController
- Phonenumber: add lock && notify optimize
- Fix error when save countries
- Small refactoring
- Phone: Now send notify!
- Change changeEnumeration null to empty value
- Add Bitrix && CS-Cart has_product options
- Add OnePhone Pay version
- Add CS-Cart and GForms
- Fix bugs with multiple fields
- Add status logs
- Fix GForms error when good key.
- Set 40 limit to Lead key
- Add frameworks_integrations_pay
- Change Status Blocking()
- Add descriptions to StatusController::siteChange()
- Add block() to status
- Refactoring StatusController and add block func to CrmRequest
- Hot fix! Change timezone to Kiev!
- Update timezones
- Show timezones in logs
- Fix DB and Server Timezone bug
- Refactoring OrderStatusJob
- Add more logs to Status siteChange Controller
- Change Secure to SecureController
- Fix proxy status
- New banned portal
- Fix bug in phoneController & change log
- Fix error when status cant get No
- XML_ID improvment
- Use new chLog helper
- Add lead on 3 worker
- Update UI logs
- Fix order status job setting
- Add banned portal
- Add B24App::getInstance() to Status
- Now XML_ID is revriteble when status send
- Force send status to https
- Product sending when status changing
- Fix bugs, add products when change status
- Change status traits name
- Status: deep refactoring and now status can set when add new lead
- Status refactoring
- Chenge UA
- Add only one wueue
- Remove 3 queue fot test purpose
- Small Placement changes
- Add Binding
- Refactoring PhoneController
- Add Warning to UA portal
- Show XML_ID selector on OpenCart and Tilda app
- Fix bind url
- Chande DB
- Add Enrich Contac FAQ
- Fix bug when init!
- Fix bug with enrich contact
- Add $FieldsController
- Delete type param
- Improve send MSG
- Add more logs to Lead Job
- Refactoring Send Message
- Add lead_ID to log
- Hot fix! Error when show fields
- Now we logging lead and deal ID
- Fix bug with log in Enrich
- Error when adding Lead Job!
- Add log when create Lead And Deal
- Fix bug when save setting
- Remove some translate
- Available to everyone translate
- Update JS and Css
- Now Field is main
- Update packeges
- Add msg when Enriched
- Add Responcible from Contact
- Translate to new settings
- Add PortalLog when status changed
- NEW: Enrich Contact info
- HOT Fix!
- Refactoring uniqueId() in OrderStatus
- Refactoring uniqueId() in OrderStatus
- Remove GDrive, Finance & ECP Controllers
- New Apps Selector Core
- Refactoring main Lead method
- Add uniqueFor() from settings
- Oprimize OrderStatusJob
- Status now send URL if 500 error
- Queue: Status now has own queue
- Remove Flamix.Finance and Google Drive
- Fix error in field matching template
- Queue: Lead to queue_type
- Add new Settings UI
- Routing refactory
- Remove JS from UI
- Add Bind::init
- Change queue settings
- New menu
- Translate
- Add package.json
- Remove old queue starter
- Change DEV Env
- Not run Queue in dev env
- Now Queue have 6 stream
- Now Lead App have own fork
- Add br to status msg
- Status loader
- Fix status_inc page bug
- Change loader to UI
- New Loader component
- Remove logs
- HOTFIX! Change PORTAL_ID in Log from obj to int
- Hot fix! LogController
- Hot fix! LogController
- Hot fix! LogController
- Add FAQ & Video links
- Add FAQ to Bitrix
- New theme
- Empty matching fields update
- Update JS
- Update UI framework
- Update Integrations lead pages
- env -> config
- Add Opencart & Epicenter status
- Add WP & Bitrix status translate
- Remove Queue
- New Exeptions
- Fix Add placeholder
- Add new menu locations to header
- Remove UI
- Add new error template
- New error hendler
- New themes
- Add FAQ to dev))
- StatusController Refactoring
- Fix Proxy Status URL
- Fix @if($slot->isNotEmpty())
- Update input style
- Small fix
- Add setPoertalId
- Tilda:Improve instuctions v2
- Tilda:Improve instuctions
- Phpne formating & Lang files
- Add manualy phone format
- Phone plugin
- GDrive Upload file link
- Tilda: Fix promocode & Find_BY
- Phone:Bug when cant find contact
- Tilda: fix syntacsys error
- Status error on some portal
- Refactoring Main Jobs
- Forgot passwor now on English
- Fix bug when take Trial
- Update font size on Demo UI
- Minify JS & CSS to product
- Update Trial UI
- Update License UI
- Move env() to config()
- Update Laravel to v.9
- Remove error_log from commit and add to ignore
- Prepare to proxy sent status
- Fix table_lead_field_product_xml_change translate
- GForms: Ignore left menu
- Fix typo in instructions
- GForms: Add translate & config
- Add XML_ID changer to Woo
- Add default APP_KEY
- Remove some translate
- Add Rozetka translate status
- Fix custom produc search
- Hot fix: Disable new env
- XML_ID translate
- Add FIND_BY custom
- Rozetka fix CMS
- Fix wrong SKU search
- Fix bugs with Bridge of Fields
- Fix Protal Id in new FieldValue Controller
- Add payment to tilda
- Add boolean and select types
- Optimize Lead and Deal code
- Add rozetka env
- Menu & Proxy Hot fix
- Add Domain to Proxy
- Tilda: Fix options
- Fix Auth rules bug
- Hot fix
- Fix menu
- Add Marketplace to menu
- Update Rozetka env
- Tilda - Fix Promocode error
- Marketplace: Rozetka integrations init
- Disable auto queue and fix tilda vatiation bug!
- Formating CMD: Queue auto start
- Add cmd queue check to sheduller
- Add cmd queue check to sheduller
- Add CMD: Queue auto start
- GForms: Add URL
- GForm: Add new bright
- fix problem whi bitrix installing
- Add Bitrix installing
- Child fix
- Dev: Chance queue to sync
- ORDER_ID to TILDA
- Bug with LEAD access
- Tilda: Add order_id to field
- Fix bug with LEAD -> DEAL convertations
- Fix license bug
- Add api_token to Robots toute
- Robot: Search duplicates
- Add video to apps (tilda, wp, op, gdrive, paperless)
- Fix tilda all FIELDS
- Tilda PRO: Improve Product & Delivery info
- Fix error with route
- Fix bug with queue listen
- Tilda: UTM&UF_CRM_FX_CONVERSION
- Add all UTM
- Integrations:Create field button & Translate status functionality
- Create status field p.1
- Sort status
- Improve status change
- Phone: Fix 500 in bath page
- Delete left menu on tilda
- Tilda fix menu
- Phone format pay version
- Add Tilda config
- Fix bug with Phone on batch
- Improve QUEUE interval, and uniq Lead
- Change save method
- Fix tilda controller
- Fix error with send msg
- Fix error with send message in Queue
- Add tilda views
- Tilda: Fix product
- Disable caching on Queue
- Add Log to Status Order_ID field
- Change Queue to DB
- Add Queue Cron Checker
- Tilda&Product controller mod
- Pretty syntacses
- Modify Lead Add second parameter to objects
- Improve Logs Views
- Fix Portal Log
- feauture: Lead Add now work EXTRYMLY FAST with Queue
- Move DebugBar to Middelware & Remove $type from integrations
- Queue prepare
- Improve Logging in Integrations
- Fix bugs with email parse
- Tilda v.1
- Fix Phone Batch format
- Country must be always array
- Fix error with phone formatig NAME
- Menu fix for OnePhone
- Phone - change token
- Fix route problem
- Modify Phone config
- Finance - add CRM close
- Remove UA default version from phone
- Finance Robot v1
- Add finance robot
- Update
- Finance setting bone
- Array to string convertations
- Add finance route
- Add phone env & web route
- Phone format run for all base
- Deny free plan
- Fix error with non admin user & add license
- Fix Queue bug
- Remove composer.lock from git
- Fix product bug
- Refacroting product and integration
- Refactoring p3
- Add to CONTACT_CENTER
- ECP - PAPERLESS - LOGIN
- Lead and Site sync
- Lead and Site sync
- Add lead CRM sync
- Add lead CRM sync
- auto setting
- Fix bugs with auto duplicate options
- Setting bugs in WP fixed
- Change days word
- Add English to Default Language
- Fix HTTP_HOST in app.php
- Move get ORDER_ID to StatusController
- Fix bug with order ID
- Update UI
- Update UI
- Add new error controle
- Improve Status Validations
- Oprimize Add Lead
- Add URL to Fields
- secure:Lead sync error
- Add Lang to Public API
- Add public API
- GDrive pay Bill ID
- Update GDrive Pay Version
- Modify .env ALL
- Change LOG
- Add top menu
- Delete menu
- Fix Google Drive error
- Add GDrive public
- Add Google Drive Base
- featire:Add WP&WooCommerce payed version
- Small changes
- Add danger fields msg
- secure: Update status event provider
- Add instructions and translate
- Bind page
- Almost finish status
- Status fix
- Compleate Status p3
- Add status view
- Status p2
- Status dev version
- fix
- Smart Apps Cheking
- Add OpenCart module
- Light Dublicate Controlle
- Add Product finder
- Add Double
- Add Integer and Date
- Fix default Route to WooCommerce
- Update main server
- Change env scope
- Fix Bug with phone number
- Add Currency
- Add URL and some translate
- Update ENV, Make all app Free, Add WooCommerce
- Add bad browser msg
- Fix bug with email
- Lead: Support File Upload
- Fix bugs with setting
- Fix user msg bug
- Update UI
- Change email filter
- Change login
- Add menu and some insert fix
- Ad if to placement
- Add norm user blade
- hide menu and update UI Css
- add gitignore to upload
- Fix dropzone
- Update UI
- Back up restore
- Update UI
- Fix dropzone and add new Bitrix product
- Update UI and add new support plane
- Update UI
- Add CRM plan to env
- Change prefix ECP
- Change Menu
- Change Menu
- Change Menu
- Change ECP default route
- Change Access settings
- Pre deploy
- Finish finance auth
- secure: Fix bug with access
- Add Bitrix and Frameworks
- Start ECP programming
- Secure: Change app start setting and Header Menu
- Delete UI Lang file
- Fix bugs when have only PRODUCT_ID
- Bug with product finder
- Add url to deal and order
- Add Product Finder
- Report ro telegram
- Small changes
- Fix Lead Bugs, add WP and add Deal
- hide QUQUE
- Translate menu
- Lang and some settings
- separated some functions
- Add separeted Custom fields
- Change multilang and Envoy
- Add multy domain
- Add Eng and UA translate
- Add translate
- Add Russian translate
- Update UI
- Change some UI
- Update UI
- Update UI
- Too many changes
- Add email validation
- Change DOMAIN select algorythm
- Init
Available integrations
-
 Site integrations
-
 WordPress Contact Forms 7
-
 WordPress WooCommerce
-
 OpenCart
-
 Tilda PRO
-
 1C-Bitrix
-
Adobe Commerce (Magento)
-
WordPress Ninja Forms
-
WordPress Elementor Forms
-
WPForms integration
-
WordPress Gravity Forms
-
WordPress Fluent Form
-
WordPress Forminator
-
WordPress Divi Forms
-
 Laravel, YII, Symfony, Zend
-
WIX
-
Shopify
-
CS-Cart
-
Horoshop
-
Shop-Express
Purchase and support
To write to support (add a ticket), you must:
- Go to the portal https://cp.flamix.solutions/
- Enter your mail and password. If you have not registered before, you need register. If, when you try to register, the system says that the user is found, you must reset the password;
- After successful authorization, click on the "Support" menu item, then the "Add" button;
- Describe the error in detail, attach screenshots and click the "Submit" button.

The ticket has been successfully created!
It is recommended not to close the tab until the problem is resolved since emails with replies sometimes end up in spam!
- Go to the module page and find the "Install" block;
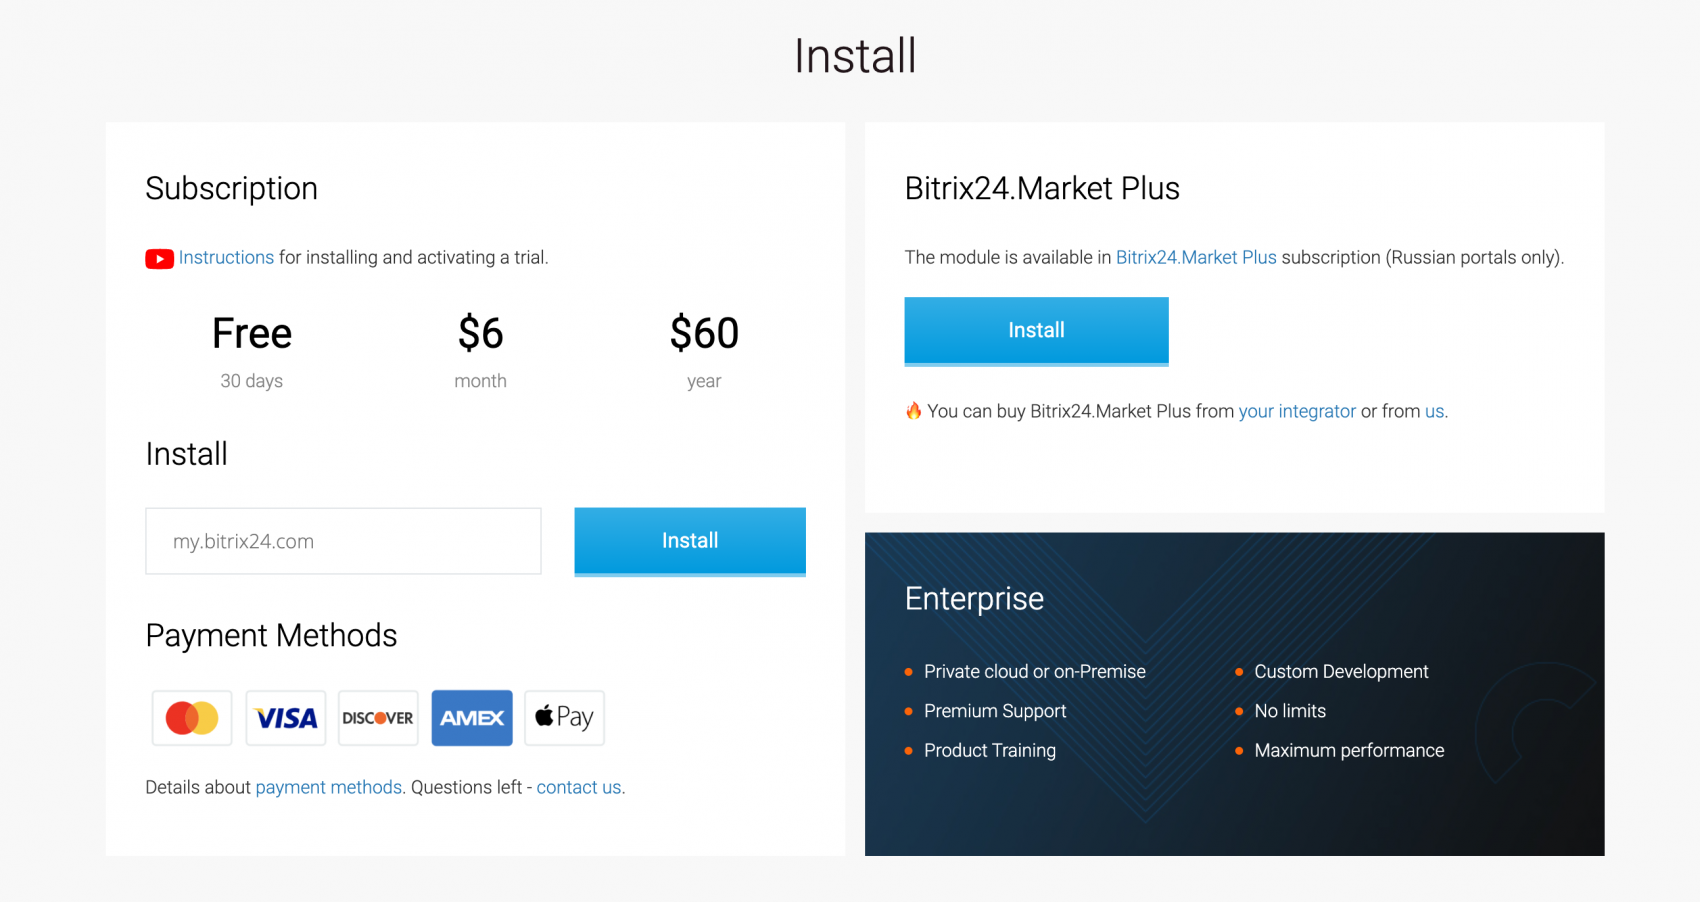
- In the field next to the "Install" button, enter your Bitrix24 portal domain and click the "Install" button;
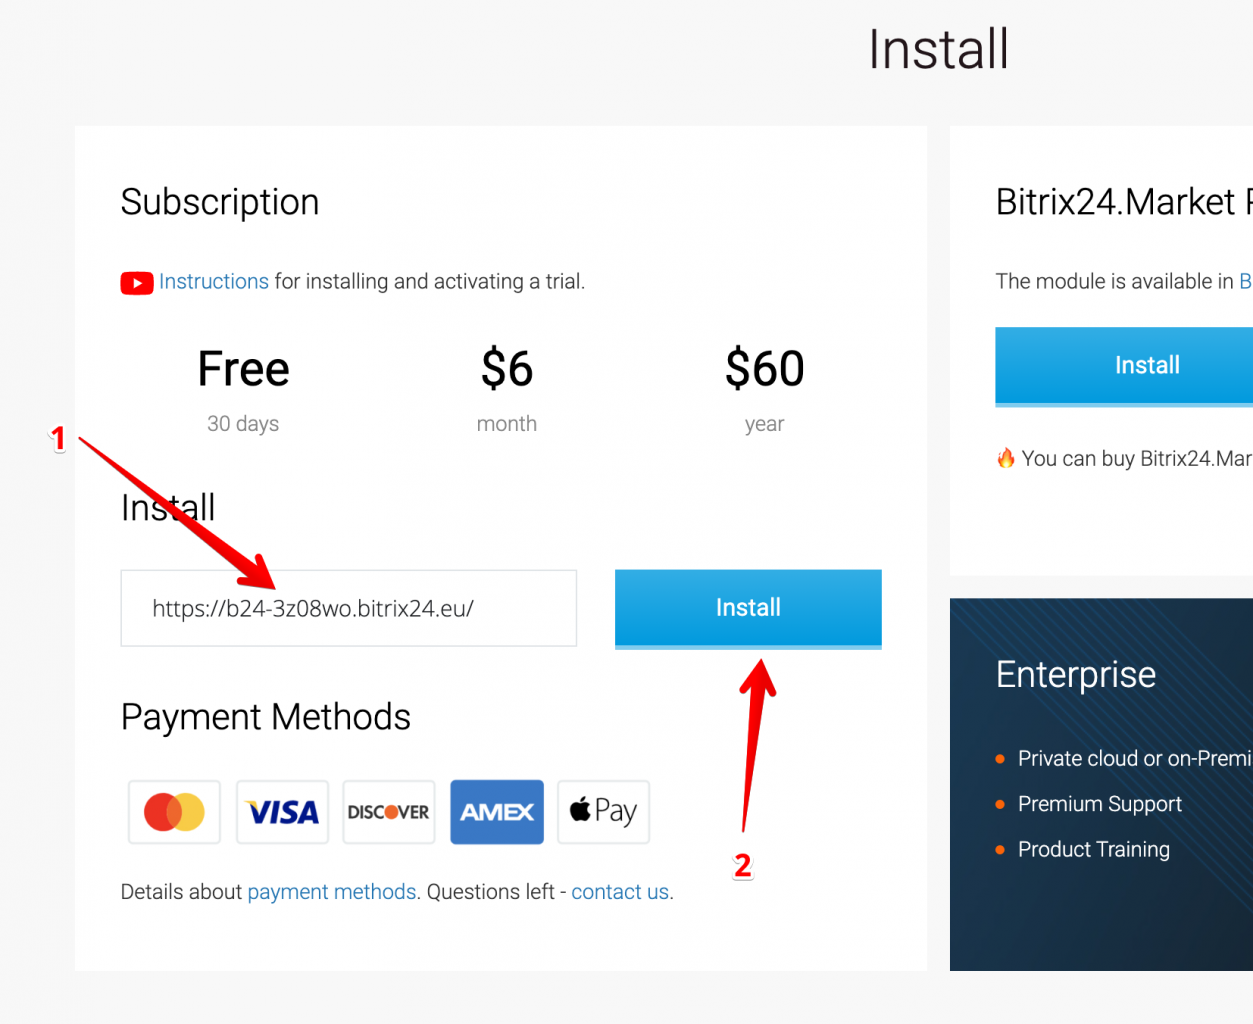
- Accept all agreements and click "Install";
- Click the button "Start Your Free Trial" (1), or paste your license key (2), if you have one;
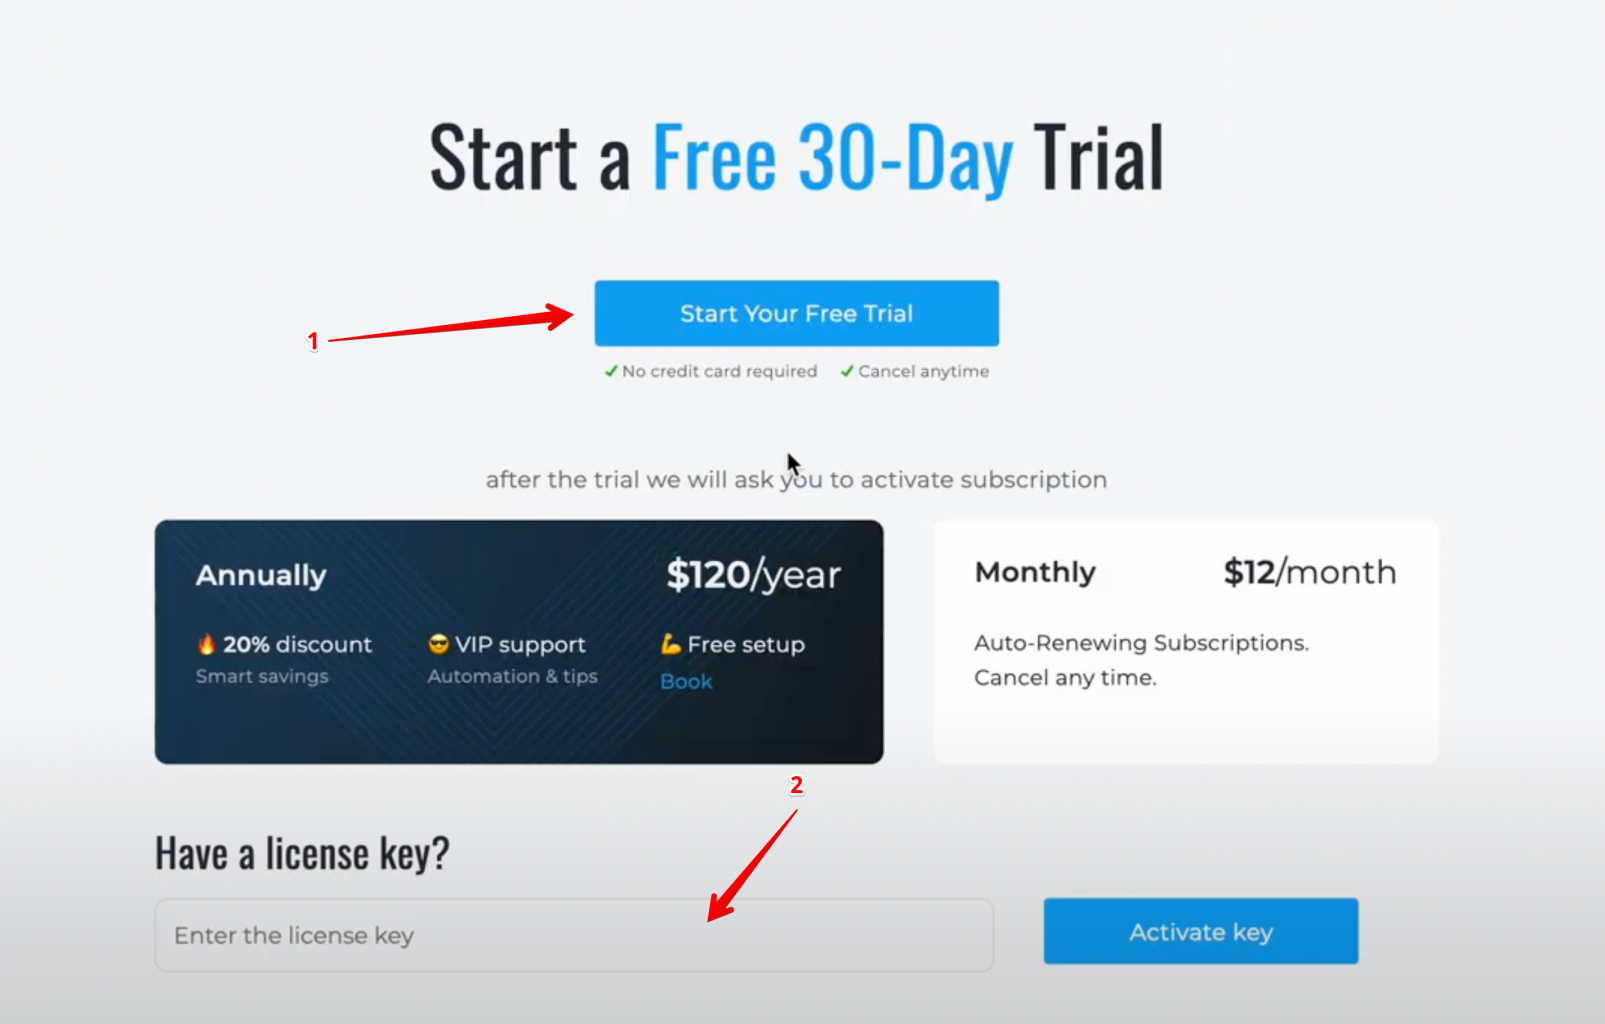
- If you have activated the trial, be sure to enter your valid email, this is where we will send the license key (check the spam if you did not receive it).
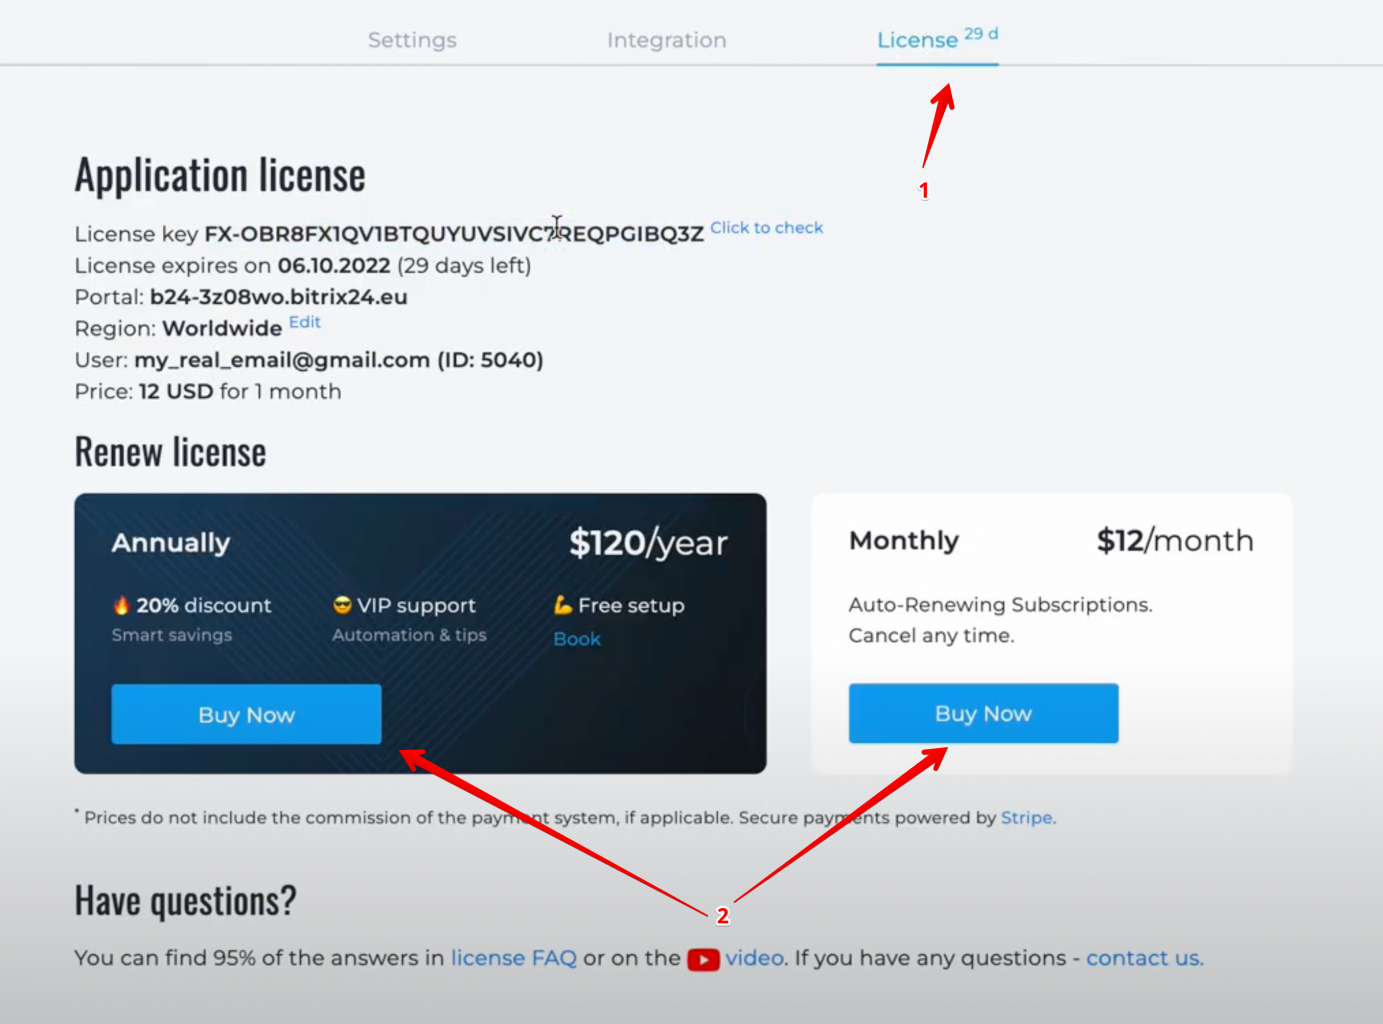
- Open the application in the Bitrix24 portal, go to the "License" page (1) and select the desired subscription period (2).
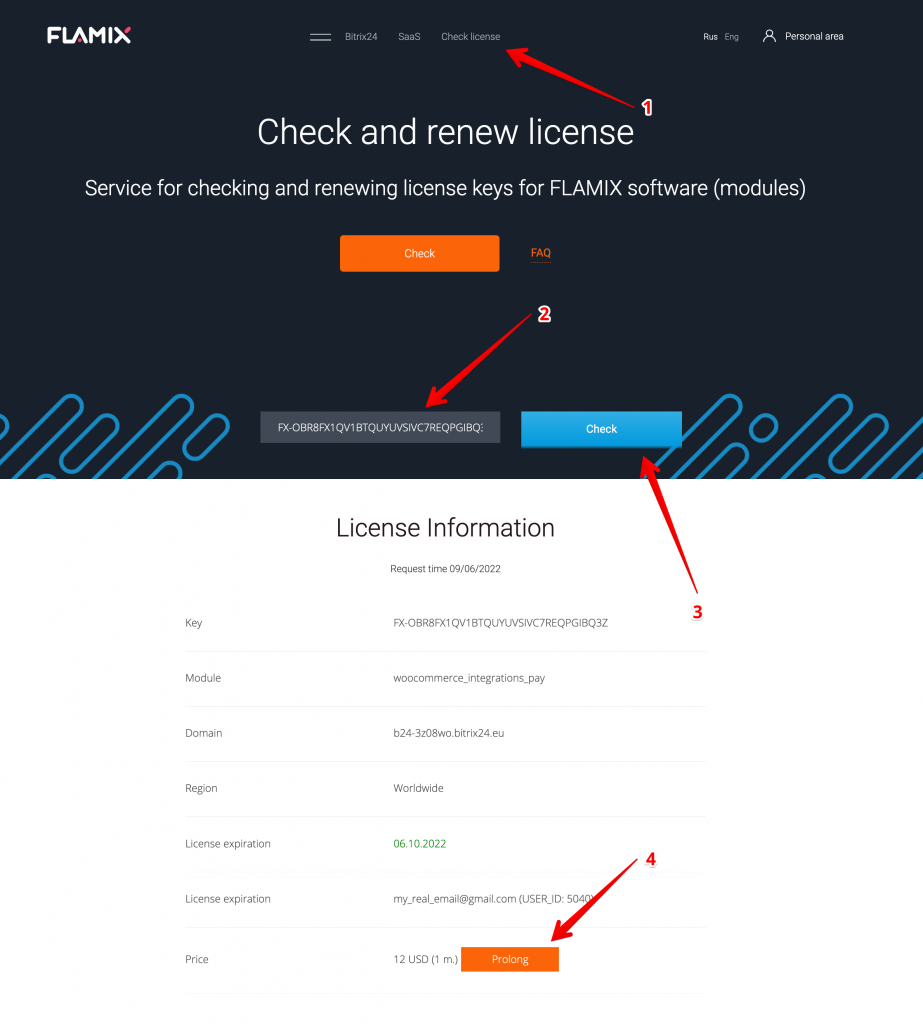
- Go to the license verification page - https://flamix.solutions/license/ (1) and enter your license key (2), click the "Check" button (3). If the license key is correct, you will see the "Prolong" button at the bottom (4).
A 20-25% discount is given to anyone who purchases a yearly subscription. You can find the discount amount on the "License" page of the application.
Special prices if we become your Bitrix24 partner. In addition to the special price, and free setup, we can make basic settings for you, and advise on any issues related to the operation of Bitrix24 or the development and optimization of your business's Business Processes. The only thing you require is to buy Bitrix24 through us (the same price, additional benefits from the Bitrix24 gold partner). Write to us if you are interested in this offer.
Note! If you already have an integrator, we can’t become your integrator again even if you want to change it.
When something goes wrong or you need to send logs to support, then you need to follow these steps.
- Open the app and scroll to the bottom;
- Click on the "Log" link.
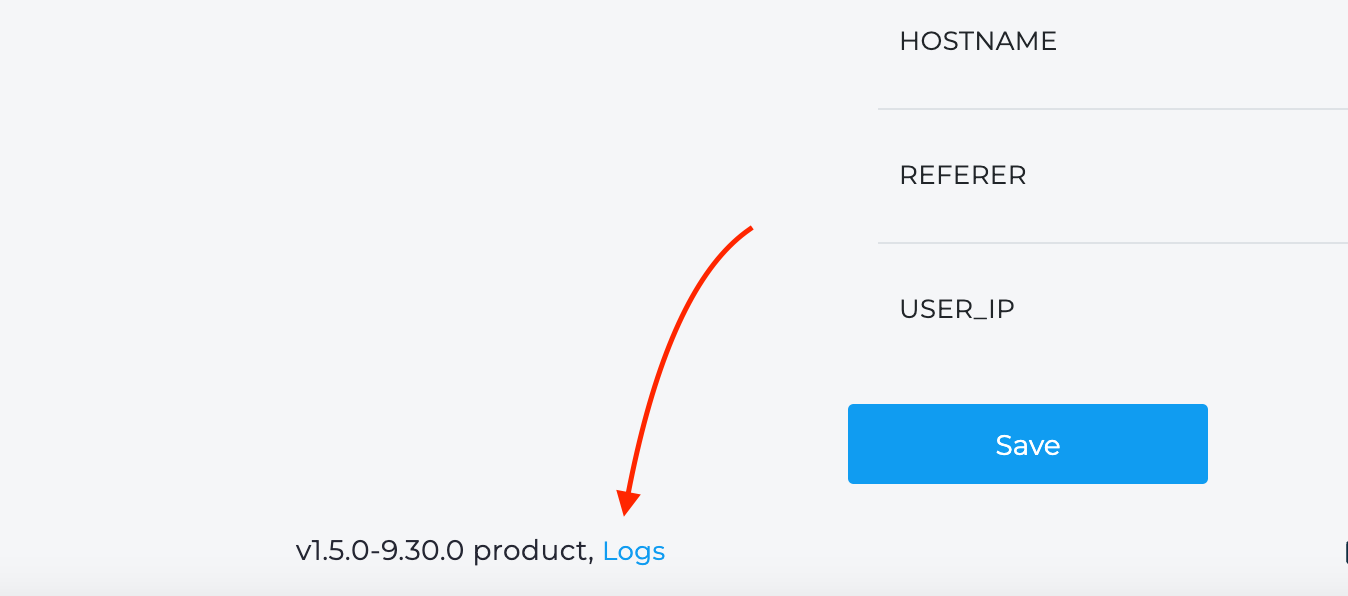 Here you can see all the information that we log. If you are a technical person, you can check the logs and find the problem.
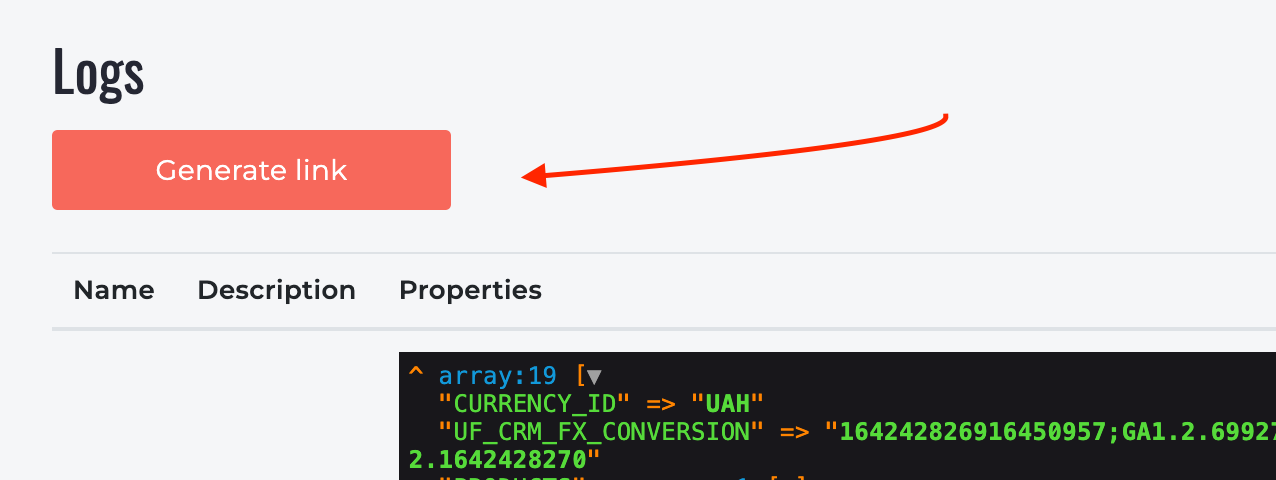
In addition, we sometimes request a link to the log. To generate it, you simply press the "Generate link" button. Copy and send this link to us. The link is valid for 2 days.
Have you extended your license, but the term has not changed? The license key is cached upon purchase and is only reset upon automatic renewal. If for some reason it did not last, try to throw off the license cache in billing(Licenses are displayed on the Services -> Licenses page) and update the "License" page in the module.

If that doesn't work, please write to support.
An Enterprise license is required in the following cases:
- You regularly more than 500 hits to the plugin per day;
- We need a modification of the Bitrix24 plugin for you;
- You want the program to work on your servers.
Implementation
- We sign NDA and service contracts;
- We allocate a separate VPS for you;
- Setting up environments, deploying a repository with a plugin (if you need support and updates);
- We send separate assemblies of plugins for CMS or set up the integration ourselves;
- We organize monitoring and support 24/7.
For purchasing write in any convenient way.
Important! We do not share the code with the customer.
Module settings
To obtain the secret integration key, follow these steps:
- Install the plugin in Bitrix24;
- Navigate to the "Integration" menu section;
- Copy the displayed secret integration token;
- Paste the key on your website where required.
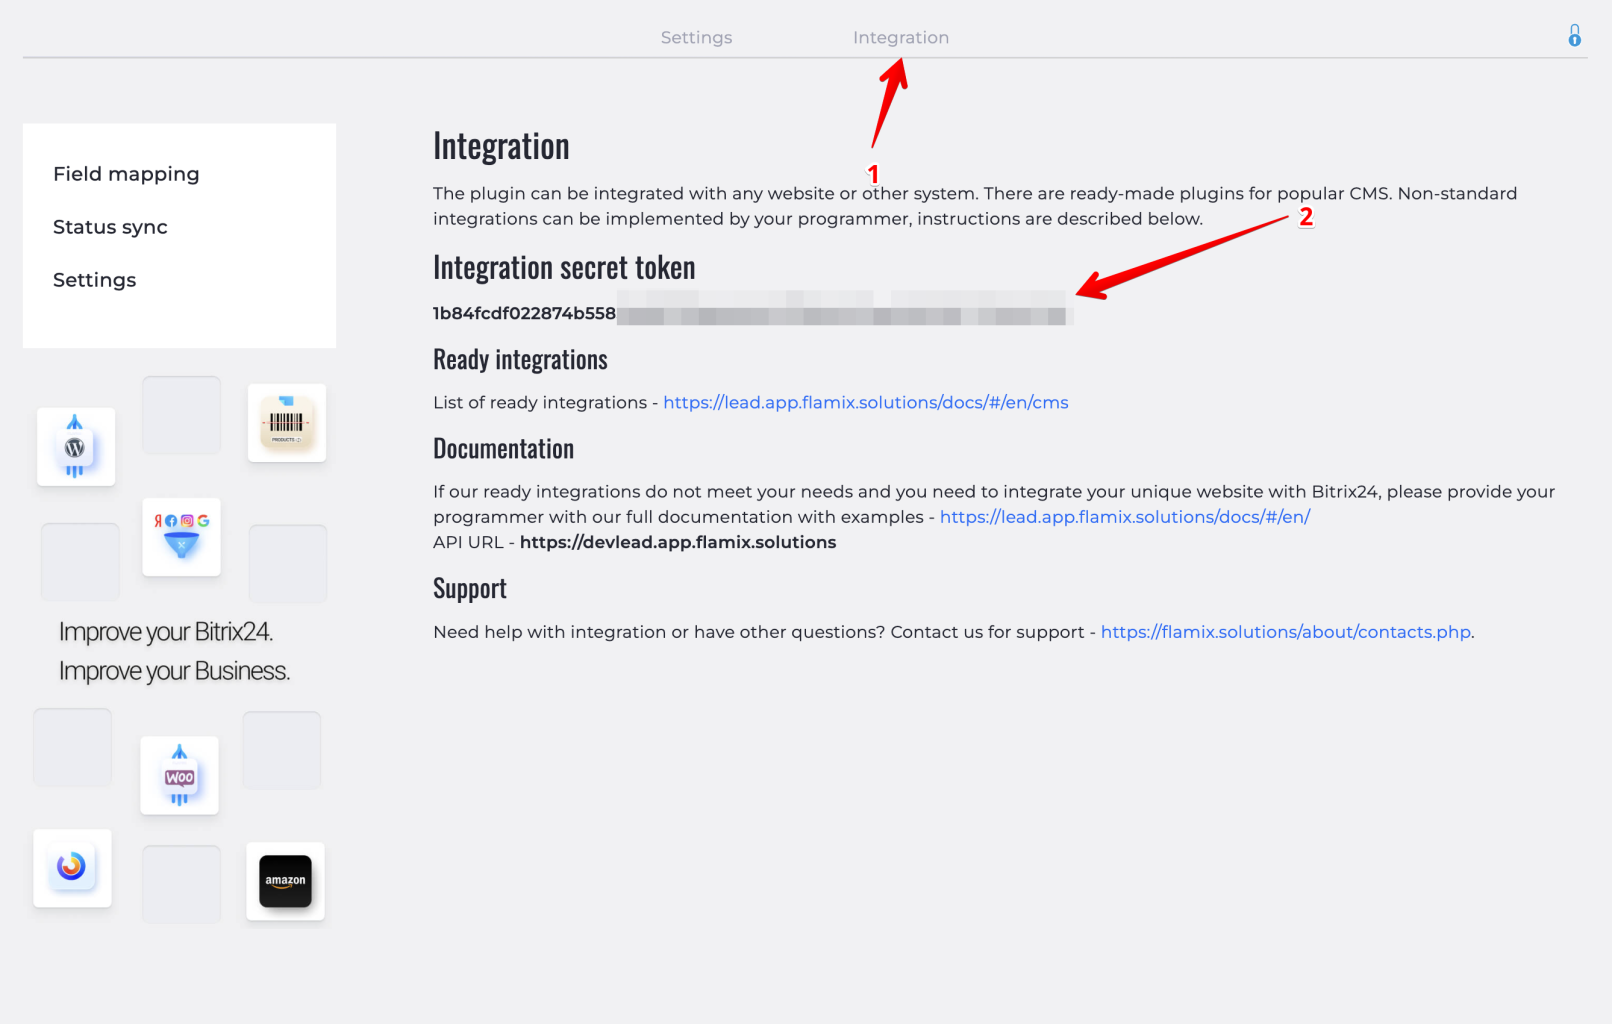
If you don’t see the key, ensure the plugin is installed correctly or contact support.
If you've double-checked that you entered the correct Bitrix24 domain and the correct integration secret key, there’s only one possible issue—you installed the wrong plugin.
Many users mistakenly install the Website Integration plugin in Bitrix24 but use a completely different plugin on their website, such as Contact Form 7 Integration. Similarly, some users install the WordPress Forms Integration plugin in Bitrix24 but use a WooCommerce integration plugin on their website.
Solution:
Ensure that the plugin you installed in Bitrix24 matches the one on your website. If you're integrating WooCommerce orders, both Bitrix24 and your website should have the WooCommerce Integration plugin installed. Always compare the plugin name—icons might change over time, but the name should match exactly.
In order for our plugin to see your field, it must be created ONLY in the Lead. If you create a field in the Lead, then convert the Lead into a Deal, then Bitrix24 will automatically create the field in the Deal and "link" it with the field in the LEAD. Thus, our plugin will transfer information in the Lead field, and Bitrix24 will create a deal and automatically transfer this value to the Deal. How to do it:
1. Go to CRM Settings, Field Settings, LEAD and create the required field.
2. Create a new Lead through the site, for example, by filling out a form or placing an order, and check how our new field works.
The Bitrix24 system is built in such a way that you cannot do without Lead. Even if you do not work with Lead, but only with Deal, then "under the hood" you still work with Lead, which is hidden from you. That is why, in order to work properly, our plugin works exclusively with Lead. And in order to work with Deal, you only need a small setting at the Bitrix24 level.
Auto conversion of LEAD into a Deal.
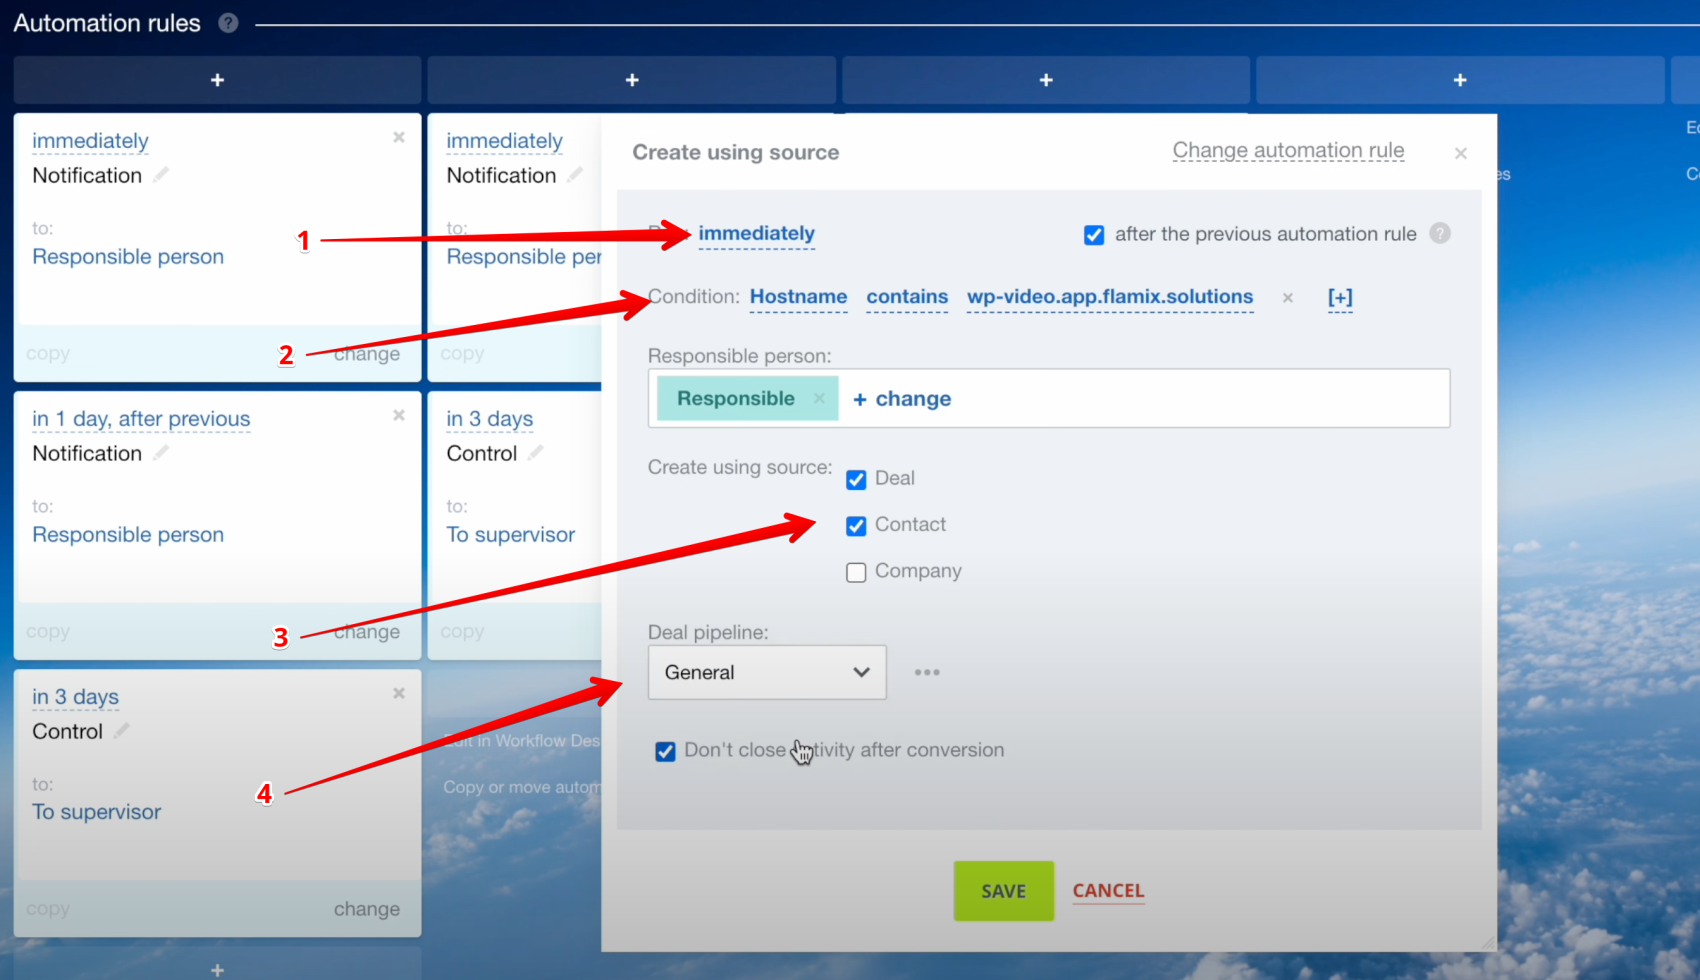
To convert a LEAD into a Deal, you need to create a simple robot. The algorithm is this:
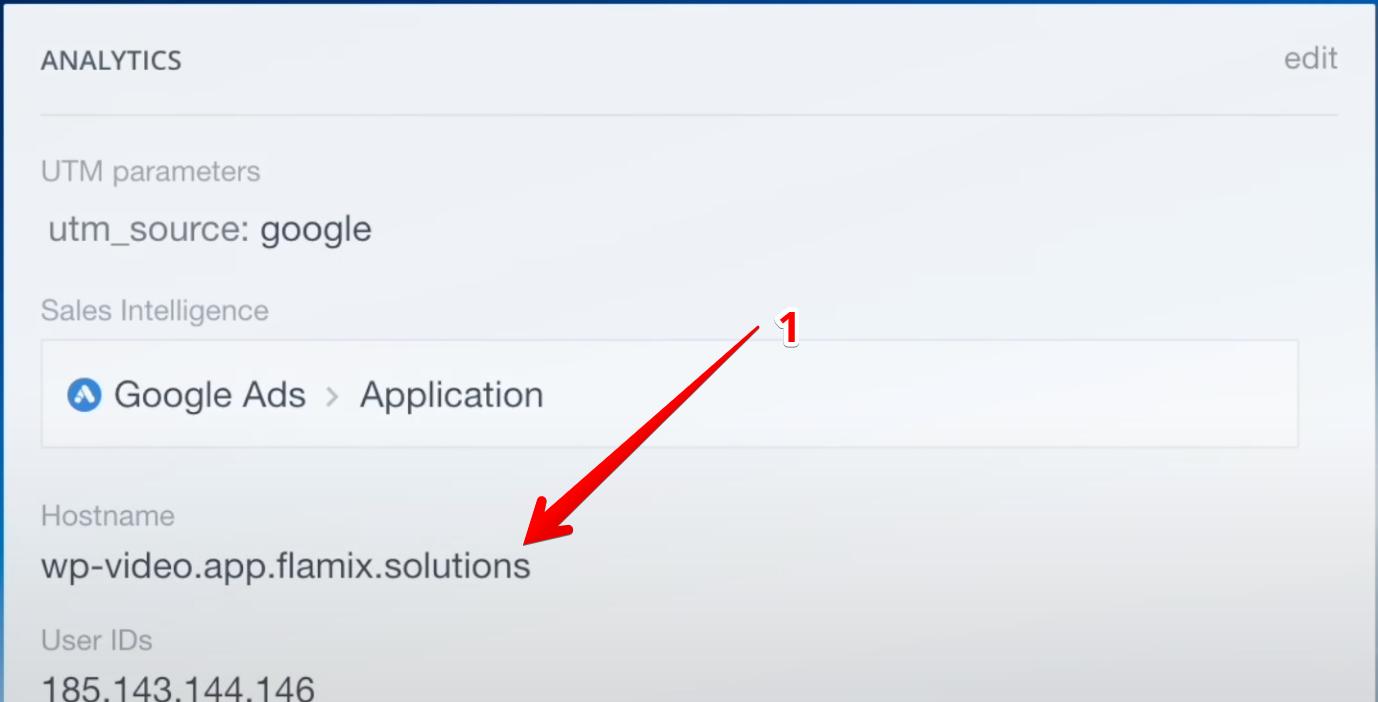
1. Create a field that will serve as an indicator that this Lead needs to be converted into a Deal. For example, it can be the "Order number" field or the "Source" field, where your site is listed (1).
2. We create a new robot that will work Immediately (1) if the Lead has our conversion indicator (2), and will create a Deal and Contact* (3) in the desired funnel (4).
3. Create a new Lead through the site, for example, by filling out a form or placing an order, and check how our setting works.
Contact* - The Contact will be created only if it is not found when creating the Lead. If you previously had this Contact in the CRM, it will be found and attached to the Lead (a duplicate of the Contact will not be created).
Video tutorial: https://youtu.be/mACtqEEAq-I?t=359
If you have a CRM without Lead, then you do not need to do this, Bitrix24 itself converts all Lead into Deal.
If your site encompasses multiple directions, you can set up automatic distribution of Deals into different funnels using either a business process or a robot. The solution algorithm is the same in both cases, so let's consider an example with a robot, as they are simpler and supported by basic tariffs.
In the LEAD or Deal, we create a text field "Site Domain". In the plugin settings, we select the match "Site Domain" = HOSTNAME, where HOSTNAME is a standard field containing the domain name.

We move to CRM, select the necessary entity (LEAD or Deal), add a robot that will trigger if the "Site Domain" field contains the required domain. This robot will change the Deal stage only for requests coming from the specified site.
- When working with LEADs, at the first stage create a robot for conversion into a Deal, where you select the desired direction and stage.
- When working only with Deals, use the "Change Direction" robot. Important: the field must be passed from the LEAD, so create it there!
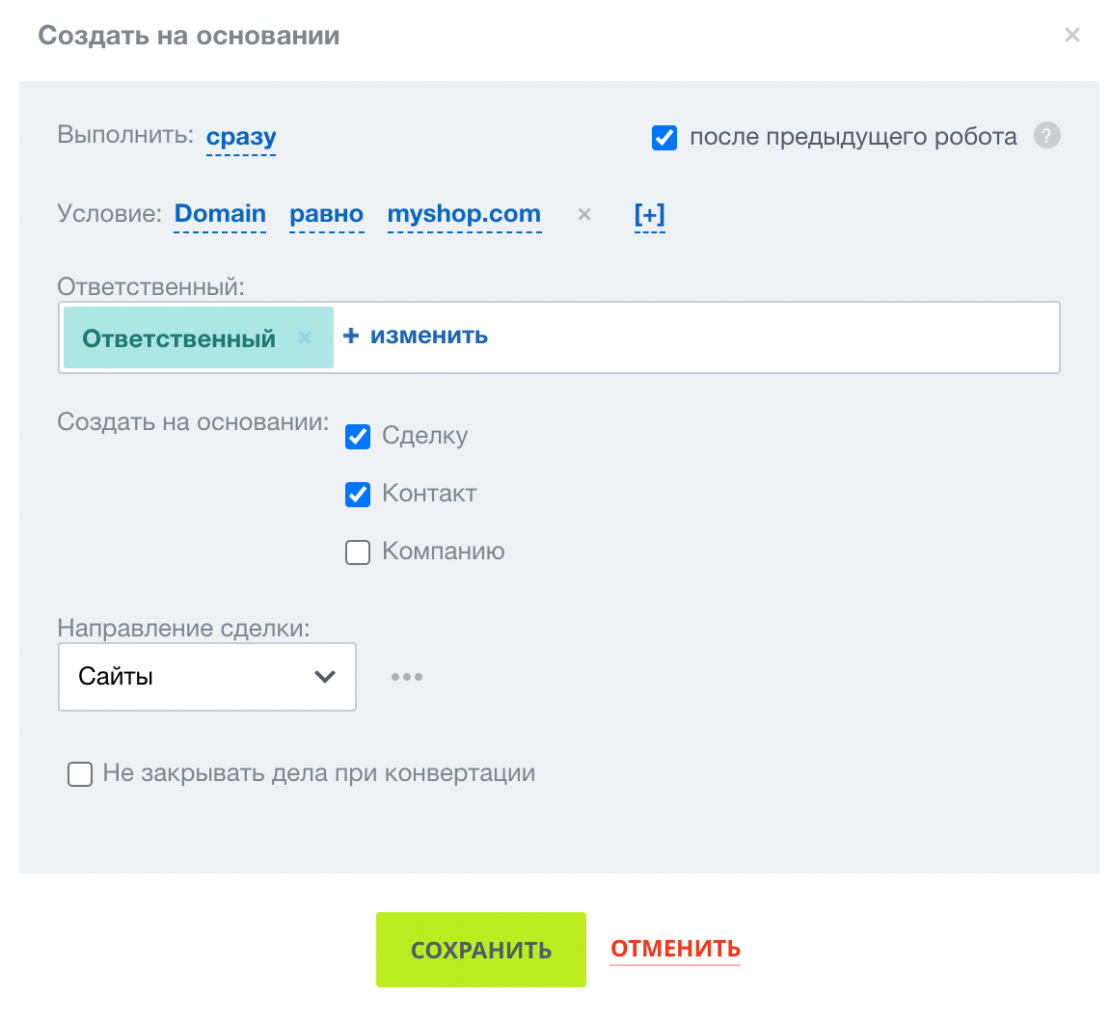
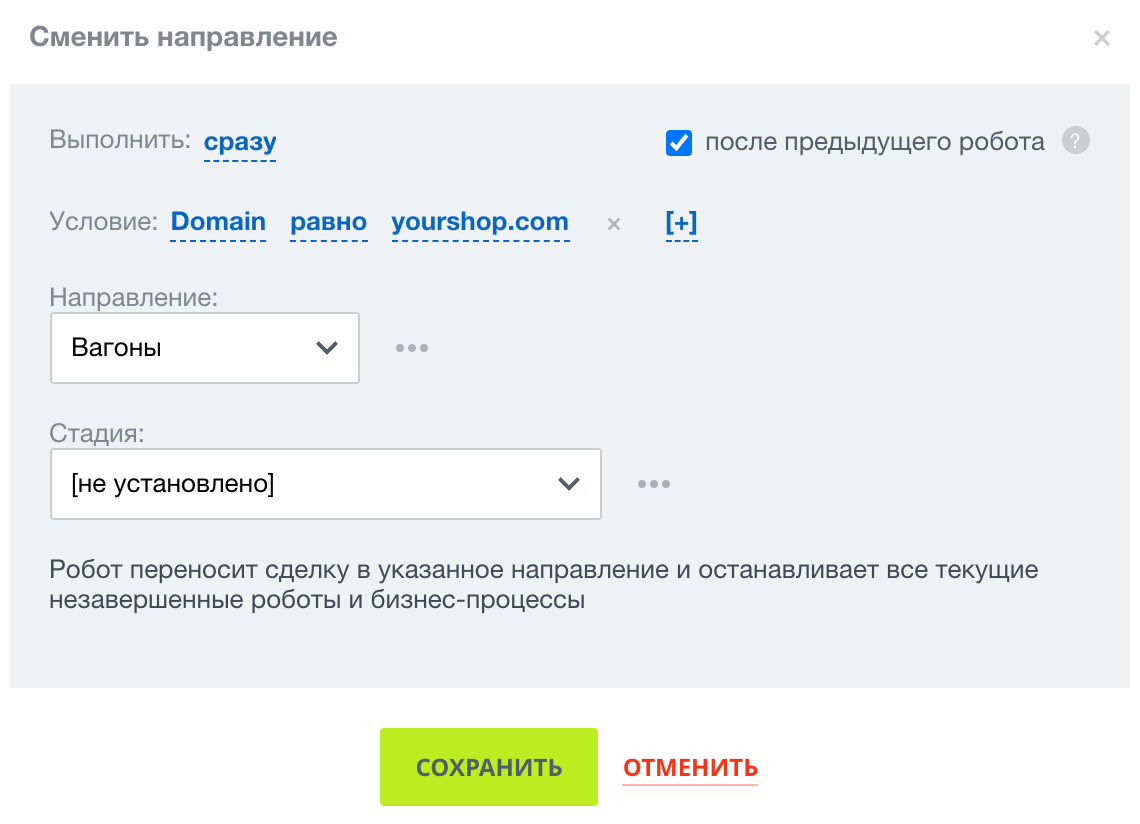
Important to know:
- Create the field in the LEAD, even if you are using Deals. When converting a LEAD into a Deal, Bitrix24 will automatically create the necessary field and transfer the value.
- Business processes are triggered before robots and have an extended functionality.
UTM tags are labels in a link that help determine where a visitor came from to your site.
Typically, these labels are added manually. Some advertising systems set them automatically when someone clicks on an advertisement. However, if a visitor comes to your site not from an advertisement, such labels usually aren't present.
Imagine that you ordered a promotional banner on SITE.COM. If the banner features a simple link like "https://mysite.com", no additional data will come to your site when someone clicks on it. For your site to recognize that the visitor came from SITE.COM, the link should look like this: "https://mysite.com/?utm_source=site.com". This way, your site will see this tag and understand that the visitor arrived from SITE.COM.
UTM Tags Are Not Working
UTM tags may not be passed for various reasons, and this is a normal part of data protection policies. The main factor is cookie blocking. Below are some common reasons:
- Incognito Mode: If the user accesses the site in incognito mode, UTM tags may not be saved.
- Browser Plugin: Installed browser extensions can hide or block UTM cookies.
- Site Plugin: A plugin on the site may be active, automatically stripping UTM tags from the URL.
- Using a Different Browser or Device: If the client starts a session in one browser but places an order in another, the tags will not be passed.
- Redirects: Passing through intermediate redirects can result in the loss of UTM tags.
- Cookie Expiration: If cookies are set to a short lifespan, the data may be lost.
- VPN or Proxy: Using privacy technologies like VPN can block or alter URL parameters.
- Incorrect Link Formatting: Errors in generating UTM links can lead to improper processing.
- URL Trimming: Tools that automatically clean URLs may remove UTM parameters.
- Interference by Advertising Platforms: Some ad platforms may modify or remove tags when generating links.
- Manual URL Copying: If the client copies only the main part of the URL without parameters, the tags are lost.
Note: We do not investigate cases where UTM tags were not received. You can troubleshoot this on your own or consult your developer.
This mechanism dynamically sets UTM tags by detecting the click's source. Let's compare two scenarios when someone accesses your site from organic traffic:
- Without SmartUTM: Clicks from Google's organic search don't automatically set UTM tags, so your site won't show the "utm_source" tag.
- With SmartUTM: If someone clicks from Google's organic search, our plugin reads the referral and automatically sets “utm_source=google.com” on your site.
This functionality works for any website. Remember, manually-set UTMs take precedence over dynamic ones. So, if a link already contains “utm_source”, Smart UTM won't override it.
To understand the usefulness of this option, it is necessary to consider a small example. Let's imagine that you have a Contact who left a message in a simple form, where put only his first name, phone number, and comment. In Bitrix24, a Contact will only have a phone number and a first name. After some time, this Contact will make an order in-store and send ALL Contact info. In this case, we may lose some of the data, because the plugin will find a previously created Contact (which does not contain a phone number and last name) and link it to a Deal or a LEAD.
You must enable the "Enrichment contact" option to prevent this from happening. Go to settings, and turn it on. If this Contact is found, the plugin will add all the standard fields if they are not previously filled. For example, if you filled Contact name, then it will not change.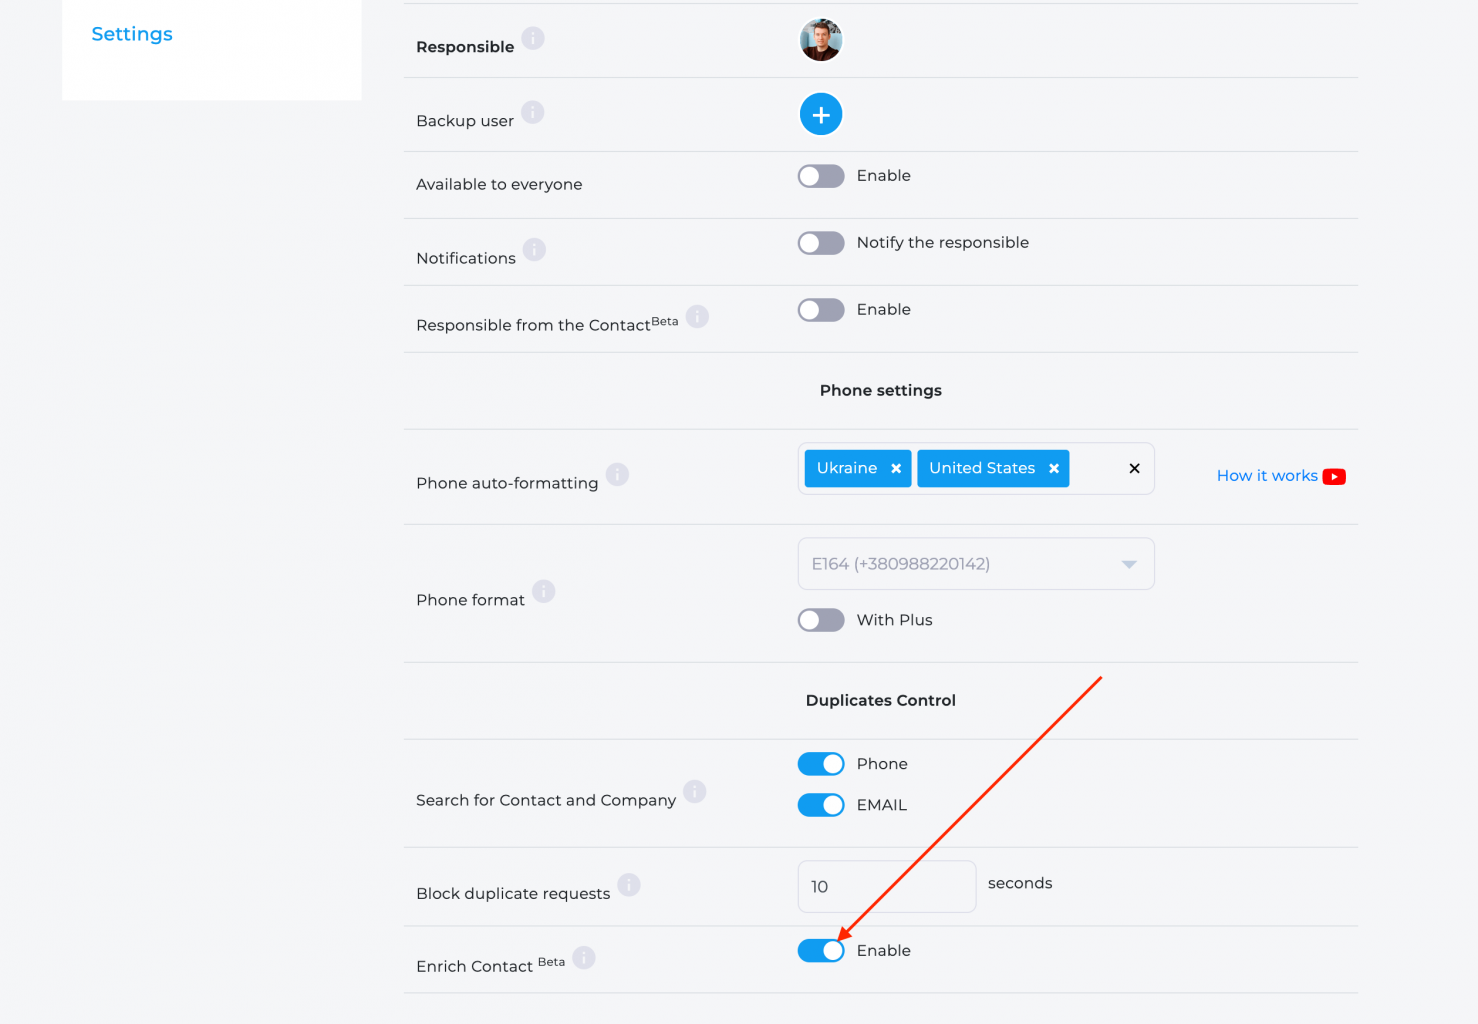
The functionality works with the following fields:
- First name;
- Middle name;
- Last name;
- Phone number;
- Email.
When we add a lead to Bitrix24 from the website, we use a queue system. Queues are like waiting lines, where each new request takes its position in the order it was received. Let’s explore the specific advantages of this approach:
- Guarantee of processing every request. Queues ensure that every request submitted from your website will be 100% processed. This prevents the loss of potential clients due to technical failures or system overloads.
- Protection from Bitrix24 failures. If Bitrix24 is temporarily unavailable or experiencing issues, the queue system preserves all data. Once the system is restored, leads in the queue will be added without any loss.
- Lead processing time. Processing a single lead may take up to a minute (usually 6-10 seconds), especially if the request contains many items. This is normal and part of the thorough handling process for every request.
- Website performance speed. As mentioned above, the lead addition process is not fast. Without a queue mechanism, the process of placing an order or submitting a form would take a considerable amount of time (from 5 to 60 seconds). Queues reduce this time to 0.001 seconds.
The downside of this approach is that delays can sometimes occur. This happens because the number and duration of new requests may exceed the current processing capacity. It is important to understand that small delays are normal and should not be a cause for concern. It simply means your requests are in the queue and will be processed soon.
However, if we notice unusually large delays, we take action. This may include adding new queue handlers or blocking a portal that sends spam.
The maximum queue size is 1,000 requests, which are processed on average within 20-40 minutes. If it exceeds this number, we receive notifications and address the issue.
Blocking a portal occurs if the client’s website is hacked and sends an abnormally large number of messages. If you are banned, you will receive a notification at the email address specified in the plugin on your website. To remove the block, simply fix the issue and contact us.
Orders in our system are usually sent immediately. However, if for some reason an order cannot be sent right away, it is placed in a queue to be sent after 1 minute. This queue is processed either on a schedule (cron), or when a user visits the site.
If the queue is set to be processed by cron, but cron is not running, then orders will not be sent. Similarly, if the queue is set to be processed when users visit the site, but users do not visit the site, orders will also not be sent.
Recommendation: For more reliable and timely order dispatch, it is recommended to move everything to cron processing and make sure that cron is active. You can read more about how to set up and activate cron in WordPress in this article.
Sometimes orders may be duplicated, and this is normal system behavior. When an error occurs during order creation (e.g., something is wrong with Bitrix24 or the field settings), the plugin attempts to re-add the order at the interval you set. This can occasionally result in duplicates.
You can disable retry attempts in the settings, but this increases the risk of losing an order if something goes wrong with Bitrix24. We still recommend keeping this feature enabled and manually deleting duplicate orders. You can disable it in the settings. 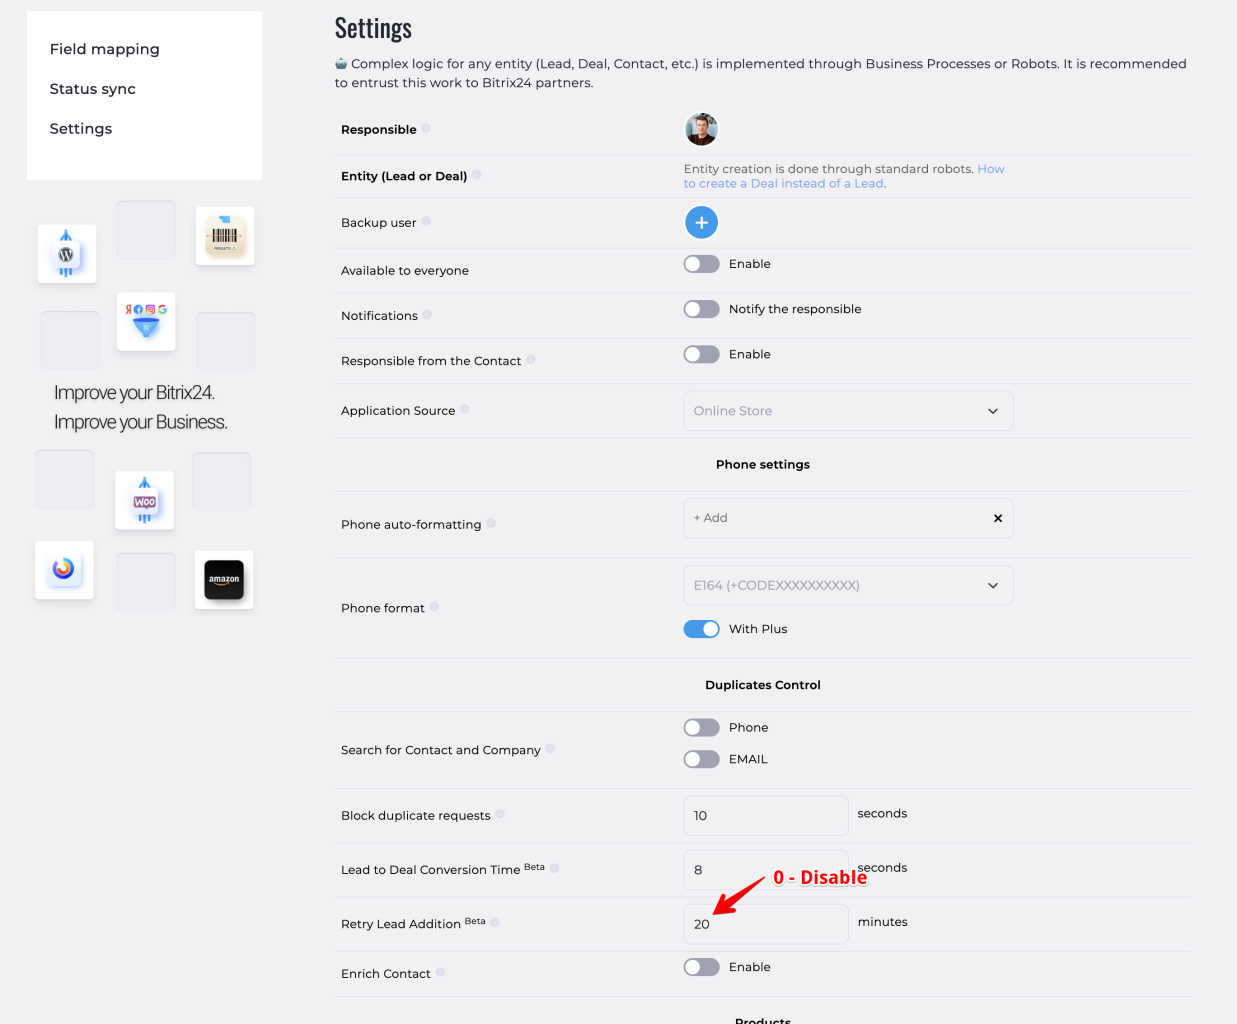
If duplicates appear constantly, you should check the integration settings and review the logs. Identify the error causing the interruptions and fix it. This could be related to incorrect fields or temporary CRM unavailability.
Statuses, unlike LEADs, do not have a guarantee of delivery due to various technical and logical reasons. Please note! We do not analyze why a status did not reach you, as it may fail for reasons beyond our control. Therefore, please read this description carefully to be able to check and correct errors yourself if they are detected.
Basic Rules
- 1.1. Enable status exchange in the plugin settings.
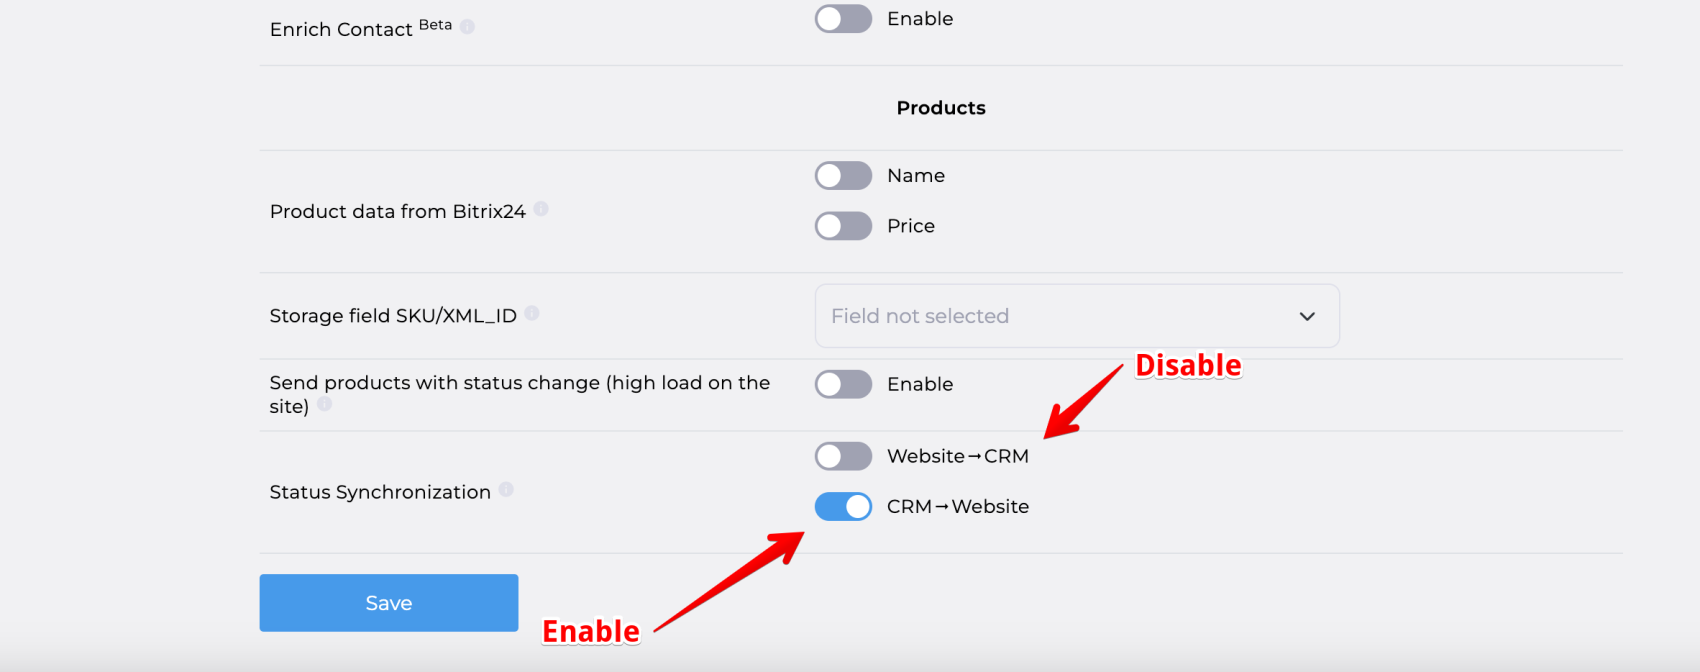
- 1.2. A status cannot change entities and directions. For example, a status cannot convert a LEAD into a Deal or change Deal directions.
- 1.3. A status is blocked for 20 minutes tied to the order. For example, if your site sent that order #2 changed status to PAID, then you immediately switched the status on the site to any other, and then returned it to PAID after 10 minutes, our plugin blocks this request as duplicate.
- 1.4. Statuses have the lowest priority in the queue, so they may be executed with a significant delay.
- 1.5. The entity must have an order number in the field specified in the plugin settings.
- 1.6. Your site must work correctly over the https protocol.
Transferring Status from Bitrix24 to the Site
Bitrix24 informs us about a change in the entity's status (problem 2.1). Our plugin searches for the order number in the entity (problem 1.5), retrieves from the settings which status to set on the site, forms a webhook (displayed in the application logs), and sends it to the site (problem 1.6).
Problems and Solutions:
- 2.1. Our plugin does not receive notifications of deal changes due to problems on the Bitrix24 side. You need to wait for Bitrix24 to fix the problem.
- 2.2. The application does not display the webhook for sending to the site. Check the basic rules and ensure the status is matched.
- 2.3. The webhook exists, but the status does not change. Copy the webhook and open it in a browser. If a technical reason appears, the site will display it. Consult with programmers or order a detailed analysis from us.

Transferring Status from the Site to Bitrix24
The site plugin, on the order change event, takes the authorization secret tokens, forms a webhook, and sends it to our plugin (Problem 3.1). Our plugin checks for a deal or LEAD with that number (Problem 3.2), finds which stage to change the entity to in Bitrix24, and initiates the change.
Problems and Solutions:
- Incorrect integration settings or the wrong Bitrix24 specified. If everything is correct, you will see in the Bitrix24 logs that the plugin received the status change task.

- The order number is not found in CRM. Check the settings and search for the entity manually.
For diagnostics, you can manually repeat the request via the browser (you need to substitute your data):
https://lead.app.flamix.solutions/api/v1/status/change?DOMAIN=your.bitrix24.com&api_token=secret_token&HOSTNAME=test.com&STATUS=NEW&ORDER_ID=1001
Incident Investigation. We offer an incident investigation service. Our specialists will check everything for you and determine the cause of the problem. If the problem is on our side, we will refund your money.
The service costs $99. You can order it here. Be sure to send access to your Bitrix24 and your site.
There are several ways to add additional fields in the plugin. Consider an example of adding custom fields in WordPress. Other CMS have similar functionality (look for the name of filters or hooks in the plugin documentation for the desired CMS). This instruction is intended for webmasters.
Universal way
This method is good because it is built on the basis of the SDK and is not tied to the CMS and is used for any submission. For example, let's consider a task where when submitting any form or order, you must always add HTTP_REFERER, SITE_DOMAIN and Google Client ID without GA. The disadvantage of this method is that it works until all fields are received, i.e. in fact, you will not know which fields you are passing. If this is WordPress, then the first and stable entry point of any file is functions.php. To solve this problem, add the following code to the functions.php file:
try {
	$flamix_extra_fields = [
		'HTTP_REFERER' => $_SERVER['HTTP_REFERER'] ?? '',
                'SITE_DOMAIN' => 'mysite.com',
	];

	$cookie_ids = \Flamix\Conversions\Conversion::getFromCookie();
	if(!empty($cookie_ids) && isset($cookie_ids['_ga']))
		$flamix_extra_fields['google_client_id'] = preg_replace('/GA[0-9].[0-9]./', '', $cookie_ids['_ga']);

    \Flamix\Bitrix24\Lead::getInstance()->setExtraFields($flamix_extra_fields);
    unset($cookie_ids, $flamix_extra_fields);
} catch (\Exception $e) {
    //$e->getMessage();
}
WordPress Filters
If you need to change order fields or goods using previously created fields (for example, order number, customer name, etc.), you must use filters. We place filters in the functions.php file. The available filters are:
- flamix_bitrix24_integrations_fields_filter $fields
- flamix_bitrix24_integrations_product_filter $products, $order_id
- flamix_bitrix24_integrations_filter $data
Pay attention! Filters are universal for all WordPress plugins! This means that if you change the fields using flamix_bitrix24_integrations_fields_filter, then the filter will be applied both for the WooCommerce module and for Contact Form 7 or Ninja Form. This restriction obliges you not to be 100% sure that some of the incoming parameters will definitely be. For example, ORDER_ID will only be in WooCommerce. An example of implementing the task of adding a title for a Lead with the necessary information:


Top guys! Technically and design-wise, everything is top notch. The support speed needs to be improved :)
The stability and reliability of your applications for Bitrix24 never ceases to please us.
Thank you for your responsive support of your applications. You can always get the help you need.
The only cart app that works reliably. Keep it up!
The only cart app that works reliably. Keep it up!
Very convenient to use - from installation to purchase! I hope for stable work in the future.
Thank you for the improvements and prompt bug fixes!